Water
Rocket Computer Model HTML Help |
Welcome to the Water Rocket Computer
Model HTML Help Pages. These form a
companion to the context sensitive
help that is associated with each
control on the computer model itself.
These pages are
organised so that using the computer
model can be quick and easy for the
novice, yet sufficiently complex to
satisfy the curiosity of the
experienced.
Basics
 |
Getting
Started |
| |
When you first load
the simulator, you are presented with
a screen that tells you a few basic
things about the running of the
program and how to navigate around
using the  key. At the bottom of
this page there is a check box that
allows you to elect not to see this
screen again (don't worry, you can
get it back if you make a mistake). key. At the bottom of
this page there is a check box that
allows you to elect not to see this
screen again (don't worry, you can
get it back if you make a mistake).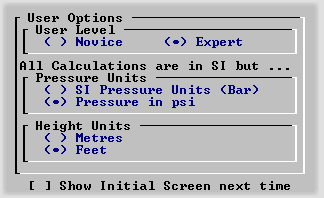 Following
this, you are presented with the
start-up screen that always appears at
the beginning and presents you with
some options. You can go onto the
program without altering anything
just by pressing Following
this, you are presented with the
start-up screen that always appears at
the beginning and presents you with
some options. You can go onto the
program without altering anything
just by pressing  or letting it
count down. or letting it
count down.
The options you are given regard:
the `level' of the user (Novice or
Expert); the units you want pressure
in (Bar or psi); and, the height
measured in metres or feet. Your
selection is stored in a zero length
configuration file so that they will
appear as the default the next time
you run the program. Pressing  takes you onto the main
screen. takes you onto the main
screen.
|
 |
First
Calculations |
| |
 |
Just
Press  |
| |
To do your first
calculation, you can use the default
values set in the model - there is no
need to change anything. All you need
to do is to click on the Calculate
button or press  . Once you
have done this, a basic set of
results will be displayed in the
window in the top right - these are
results that people are most
interested in when doing calculations
(There is a more complete set of
results on the quick graphs page -
see Results
and Quick
Graphs). If you have a
real rocket and want to find out how
it will perform, just enter the
values that you can measure on the Input
Parameters sheet and
press Calculate. . Once you
have done this, a basic set of
results will be displayed in the
window in the top right - these are
results that people are most
interested in when doing calculations
(There is a more complete set of
results on the quick graphs page -
see Results
and Quick
Graphs). If you have a
real rocket and want to find out how
it will perform, just enter the
values that you can measure on the Input
Parameters sheet and
press Calculate.
|
 |
Changing
Values |
| |
 |
Novice
Level |
 |
| |
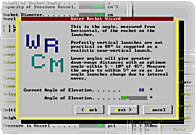
You can just enter the values but
if you prefer and you have started on
the Novice level, you can use the
Wizard (right) to help you enter the
values. You can get the Wizard
while the variables frame is visible
just by pressing  or by double-clicking the
mouse on the help box in the
top-right of the screen. The meaning
of each step is explained and once
you have finished, you will be ready
to launch the rocket. or by double-clicking the
mouse on the help box in the
top-right of the screen. The meaning
of each step is explained and once
you have finished, you will be ready
to launch the rocket.
|
 |
Expert
Level |
| |
At Expert level, just
enter the values directly into the
fields on the Input
Parameters sheet and
press Calculate. Common
values of all but one of the Environmental
Variables may be entered
quickly by pressing the appropriate
letter. With the Gamma and Density of
the gas in the rocket, both variables
may be altered at the same time by
entering the uppercase character -
the Gamma and Density of CO2 may be
entered just by pressing E.
|
 |
Files |
| |
If you want to save
your rocket for future reference or
modification, you can press save and
a form will pop up allowing you to
choose a file name and save your
work. 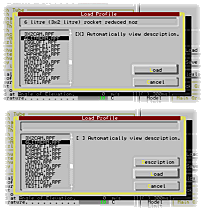 Note that
the units you use for pressure or
height do not alter the data stored
in the file and therefore this
information may be sent to different
people who use different unit sets
and they will get the same results as
you. Note that
the units you use for pressure or
height do not alter the data stored
in the file and therefore this
information may be sent to different
people who use different unit sets
and they will get the same results as
you.To load a file that has
already been saved, press the load
button and a form will pop up with a
file list window. Highlighting any
file will display the description of
that file as long as the
Automatically view description box is
checked. If it is not, a Description
button appears allowing you to see
the description of the highlighted
file. You may choose to do this if
your file system is slow (if you are
working from a floppy disc) or one of
the files is known to be corrupted
for some reason (my advice is to
delete the file).
|
 |
Print |
| |
You can
print out a hard copy of the model -
the input parameters, the model
parameters (time slice and so on) and
the results - by pressing the Print
button. 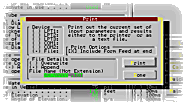 This allows
you to print to a selected output
device (on LPT1:, LPT2:, LPT3:,
COM1:, COM2: or to a file), including
a form feed if required. The output
device is remembered by the program
as is the decision regarding the
inclusion of a formfeed at the end of
the print (the This allows
you to print to a selected output
device (on LPT1:, LPT2:, LPT3:,
COM1:, COM2: or to a file), including
a form feed if required. The output
device is remembered by the program
as is the decision regarding the
inclusion of a formfeed at the end of
the print (the  form feed
just makes the printer push out the
rest of the piece of paper after it
has finished printing - the amount of
paper on continuous paper stock
depends upon the setting on the
printer for paper length). form feed
just makes the printer push out the
rest of the piece of paper after it
has finished printing - the amount of
paper on continuous paper stock
depends upon the setting on the
printer for paper length).The file
name suggested is in the form
WRCM????.TXT where ???? is a number
from 0001 to 9999 and the suggested
number is automatically incremented
from the highest file number in
existence. So, if the highest file is
WRCM2135.TXT, the suggested file name
is WRCM2136.TXT. If you have got to
9999, it will always suggest
WRCM0000.TXT - 10000 without the
leading 1. Introducing a file called
WRCM9999.TXT will force the suggested
file name to be WRCM0000.TXT and by
default, it will be appended so a
single file with all of the results
in may be created - especially useful
in a class with many users if you
want a single file as output.
You can select any 8 character
filename as the output file although
README.TXT and READ1ST.TXT are
reserved and the program will not
allow you to print over these. By
default, a file will be appended but
you do have the option to overwrite a
file with the same name.
If you want to quit the print form
without printing then just select
Done.
|
 |
About |
| |
The about button
simply displays the current version
information . . .
Water
Rocket Computer Model Release V
4.30 Copyright (c)1994 - 2000 P.
A. Grosse. All Rights Reserved.
e-mail pagrosse@compuserve.com
http://ourworld.compuserve.com/homepages/pagrosse/h2oRocketIndex.htm
A specially adapted version of
Version 1.0 of this model was
distributed on the cover disc of
PC Plus Magazine in issue 131,
September 1997 in Wilf's
Programmer's Workshop.
This Version gives a new, easier
to use interface, parachute,
launch tube and T-nozzle options,
launch angle, quick graphs
including 3D graphs and takes
into account research done by
AWARS members into the real
effects of fluid flow into
nozzles.
The 3D optimisation now includes
the ability to adopt a set of
parameters directly from the
graph thus speeding up
optimisation
by an order of magnitude.
This program is distributed only
as a zip file as an e-mail
attachment or direct download
from the above site (with MD5
hash for security). If you
obtained it via any other route,
you need to e-mail the copyright
owner at the above address. You
will also receive details of any
further updates via e-mail.
See the readme.txt file for
further details regarding updates
and registration (this program is
postcardware).
Postcardware is like shareware but
a while ago, I decided that because
paying was such a pain - getting
money in a foreign currency and then
sending it off in the post with all
of the worries associated with it
getting there safely - I would give
up on the idea of ever making any
money out of 26 years of programming
experience and ask simply for a
postcard from the person who uses the
software, of a place near to where
they live. This is a great deal
simpler, easier to do and costs a lot
less.
|
 |
Exit |
| |
In the unlikely event
that you should ever need to get out
of the water rocket computer model
program, I have thoughtfully provided
you with an Exit button and, just to
make sure that you have not made a
horrible and regrettable mistake by
selecting it, you are asked to
confirm your intentions.
|
 |
Keyboard |
| |
It is possible to get
around the program using just the
keyboard although you will hit
something of a functionality brick
wall when you get to the 3
Dimensional Optimisation
where you will need a mouse to do
some of the things there (but not
all). Generally speaking, you can
jump around the input fields by
pressing  so that you can modify
any of the input parameters. You can
alter any of the fields by typing in
the numbers although it is worth
pointing out that when a field first
gets the focus, it will highlight the
whole number so if you press any
valid input key other than an arrow
key, it will overwrite the existing
value. This is a useful function but
if you are not aware of this, it can
seem like a hindrance. so that you can modify
any of the input parameters. You can
alter any of the fields by typing in
the numbers although it is worth
pointing out that when a field first
gets the focus, it will highlight the
whole number so if you press any
valid input key other than an arrow
key, it will overwrite the existing
value. This is a useful function but
if you are not aware of this, it can
seem like a hindrance.
In addition, you can press  from any field on the Input
Parameters and the model
will calculate. from any field on the Input
Parameters and the model
will calculate.
|
 |
Caveat (or
Finally) |
| |
One thing to remember
is that this is a computer model and
not a real water rocket and the
results will only be meaningful if
they reflect your real rocket
therefore you should take care to
make reasonably accurate
measurements. The model will give
you results to one decimal place or
even two under certain circumstances.
However, in real life, you may find
it difficult to measure the diameter
of a nozzle or weigh a lightweight
rocket. Some things you will not be
able to measure unless you have a
wind tunnel or a sophisticated fluid
flow test-bed. In these circumstances,
example values are given by the model
and you can use your own judgement as
to the value you enter.
In addition to this, there are a
number of things that can make the
real flight differ from the
predictions such as the nozzle being
non-axial, the parachute deployment
being earlier than expected (or not
at all or the parachute getting
tangled), wind speed, launching
downwind of a small hill and so on.
At best, any computer model can only
provide a starting point. Used at its
best, modifying the variables
according to real flights that you
do, you can make the results more
meaningful.
The real trick is to use the model
to find out what will fly, how much
you can vary things without affecting
performance or endangering people and
go out and have a lot of fun. Play
around with the model and find out
what happens when you change various
values - you may find that you can
vary the amount of water by 100mls
either way and only affect the height
by 0.5 metres.
If you want to build water rockets
and wonder how you can do so, you can
have a look at my water rocket web
pages on http://ourworld.compuserve.com/homepages/pagrosse/h2oRocketIndex.htm
which show you how I tackled the
problems and found solutions. This is
only one way of doing it and I
recommend that in addition, you look
at a number of other people's web
sites to form your own opinions on
water rockets - links are at the
bottom of the index page.
On these help pages,
there are a number of links. The
links to these help pages
are in bold text and
the external web links are not. You
can visit any of these help
pages without a connection to the
Internet as you have downloaded the
whole `site' in the zip file.
Have fun.

P
a u l  G r o s
s e G r o s
s e
Author of
the Water Rocket Computer
Model. |
Copyright ©2000
Paul Grosse. All Rights
Reserved. |
| |
|
|
|