If you
didn't select Novice, you can optimise a two
stage rocket configuration.
A two stage rocket is essentially two
rockets that interact with each other - the
speed achieved by the booster dependent upon
the weight of the sustainer and the weight of
water carried by the sustainer - the process
of optimisation being one of reiteration.
If you want to launch a Dart Rocket, click here.
The flowchart 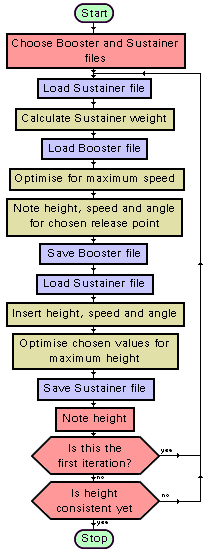 below shows the
steps that are required to carry out this
process. Noting down the height speed and
angle of an optimised booster flight and
transferring these details to the sustainer,
only to produce a different weight for the
booster to carry on the next iteration can be
time consuming, especially if you are trying
to find the best nozzle size for the
sustainer as well. Fortunately, this
reiterative process is a convergent one with
the sustainer height results settling down.
If you want to change the gas that you use or
investigate the system's sensitivity to
change in air pressure, you have to do it all
again.
below shows the
steps that are required to carry out this
process. Noting down the height speed and
angle of an optimised booster flight and
transferring these details to the sustainer,
only to produce a different weight for the
booster to carry on the next iteration can be
time consuming, especially if you are trying
to find the best nozzle size for the
sustainer as well. Fortunately, this
reiterative process is a convergent one with
the sustainer height results settling down.
If you want to change the gas that you use or
investigate the system's sensitivity to
change in air pressure, you have to do it all
again.
With this computerised optimisation, I
have taken out all of the drudgery of the
iteration process, leaving the user to choose
the files for the booster and sustainer and
then remember the height (these actions
coloured pink on the flowsheet) or the range
(it works in the same way except that it
optimises for distance downrange), pressing  Calculate
until the result becomes reasonably
consistent. The computer does all of the
loading of files and remembering optimisation
values.
Calculate
until the result becomes reasonably
consistent. The computer does all of the
loading of files and remembering optimisation
values.
Starting
Off
 Input the
values for your sustainer, check that it
works (guessing a value for speed to get a
realistic start - the computer model will put
in the optimised booster values when the time
comes) and save the file. Repeat the process
for the booster. To check to see that the
booster works, you should add in (as the
weight of the rocket) the weight of the
sustainer and the water that it carries but
once you have checked this out, remember to
make the weight of the booster rocket ONLY
the weight of the booster before you save it
- the model will add in the extra weight.
Input the
values for your sustainer, check that it
works (guessing a value for speed to get a
realistic start - the computer model will put
in the optimised booster values when the time
comes) and save the file. Repeat the process
for the booster. To check to see that the
booster works, you should add in (as the
weight of the rocket) the weight of the
sustainer and the water that it carries but
once you have checked this out, remember to
make the weight of the booster rocket ONLY
the weight of the booster before you save it
- the model will add in the extra weight.
Click on
the 2 Stage button and the
form on the right will appear on the right
hand side of the screen. Click the Select
button in the Booster frame and select the
booster file that you have saved. Repeat for
the sustainer file in the Sustainer frame
below it. Clicking on the File Name will load
up that file once selected - this is useful
if you want to have a look at some of the
settings once you have made a few runs.
At the top,
you can decide whether you want to perform
full optimisations or merely re-run an
existing pair of rocket profiles. Selecting Run
instead of Optimise will
speed up the process of just having another
look quite considerably. If you have selected
Optimise, you can decide whether to optimise
for height or distance.
At the
bottom, you can select the Time Slice -
again, the larger the time slice, the quicker
the calculation. This does not affect the
booster optimisation as the only calculations
done with the booster are until the end of
the air impulse. If you have selected height
for the optimisation, the effect on the
sustainer calculation is limited as this only
goes as far as the apogee. Selecting distance
will have a great effect as these
calculations are carried through to the end.
If you select distance, you will have the
opportunity to change the angle of elevation
by 1° or 4° degrees. When this is run, the
booster angle is changed and at the end of
the optimisation, this change of angle is
returned to zero. In this way, you can change
an angle and then optimise for the new angle
without having to remember to change the
increment or decrement back to zero.
Calculations
| The booster Parachute
option is automatically switched off
but the use of a Launch Tube remains
the choice of the user. In the real
rocket, the release of the sustainer
depends upon the pressure in the
booster and the thrust from the
booster. If, at the point where the
booster loses its grip, the booster
is still providing enough
acceleration to prevent the sustainer
from accelerating away from it the it
will not separate until later. On the
model, you can define the pressure at
which the booster will lose its grip
on the sustainer. In addition to
this, you tell the computer either:
(in the case of the crushing sleeve
mechanism) the external diameter of
the sustainer nozzle or, (in the case
of the expanding tubing release
mechanism) the diameter of the
nozzle. For a release to occur, two
things have to take place:
- The sustainer and booster
release their grip (the
differential pressure between
the sustainer and the booster
allows the crushing sleeve to
expand, releasing its grip on
the sustainer nozzle, or the
expanded tube to collapse);
and,
- The force at the end of the
nozzle overcomes the weight
of the sustainer during the
acceleration of the rocket.
The larger this area, the
higher the acceleration that
is required to keep the
sustainer and the booster
together.
Once the model has determined the
optimum velocity of the booster, it
finds the height, speed and angle of
the booster at this point. The values
for this point will depend upon the
weight of the sustainer that is has
to carry.
Imagine
the sustainer being launched
using the inertia frame of the
booster with the booster
providing an increased value of G
- the sustainer cannot take off
until the thrust from the release
mechanism can overcome this
acceleration. The force from the
release mechanism remains
constant but the acceleration
changes during the booster thrust
phase.
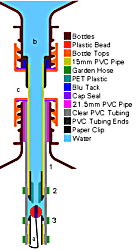
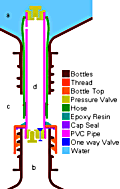
Click
on the pictures on the right for
more details.
|
|
In addition
to the height, speed and angle of the booster
at the release point, the values for:
Pressure; Temperature; Gamma of Gas in
Rocket; Density of Gas in Rocket; Density of
Liquid in Rocket; Acceleration due to
Gravity, Atmospheric Pressure; and, Density
of Air at STP are passed on to the sustainer
as initial values. The sustainer
automatically has the Launch Tube and
Parachute options switched off.
In the Sustainer frame, you can choose the
parameters that you want to optimise. You can
optimise the Nozzle Diameter of the sustainer
and the sustainer weight. If you optimise the
former, the maximum diameter will be the
mechanism diameter that you have chosen (if
the sustainer is heavy, it will require a
large nozzle for maximum height so this limit
may be reached. In this case, choose the
diameter of the stock that you have and
uncheck nozzle optimisation. If you optimise
the latter, you can specify the minimum
weight of the sustainer (if you want to find
out the best minimum weight then turn this to
1g).
Once you
have made your selections, press Calculate
and the model will do the rest. During
Booster optimisation, the progress is shown
as / and \
depending upon whether the amount of water is
increasing or decreasing. There are three
increase and decrease phases as the model
homes in on the optimum using a successive
approximation approach. During the sustainer
optimisation, the three phases appear as
blocks of different density (see screen-shot)
to show you that things are progressing. You
can also see that the values in the input
parameters on the left of the screen change
during the optimisation process.
Once the optimisation process has
finished, note the height or range and press Calculate
again. Repeat this process until you get a
reasonably consistent result - not
necessarily the greatest that you get as
these can be generated by an imbalance
between the weight that the booster carries
and the weight of the sustainer. Optimising
the sustainer will alter its weight which
will change the performance of the booster
which will alter the starting point of the
sustainer's flight and so on. The process is
reiterative and should be repeated until it
is reasonably consistent.
If you are optimising for range, you may
find that lowering the booster launch angle
will give an error. If this occurs, it may
well be because you have lowered it too much
(the model considers that hitting the ground
whilst still in the air impulse phase to be
an error as this can be dangerous). If this
occurs, raise the angle by the amount you
lowered it and then use a smaller change of
angle to lower it by. You should find (if the
duration of the air impulse is short enough)
that the maximum range increases as the angle
is lowered, until a maximum is reached. You
can find the angle of the booster by clicking
the mouse on the booster file name.
If you want to change one of the variables
- say pressure - then press Done,
load the booster file, change the value and Save
it. Press 2 Stage and the
filenames and options that you used will
still be there so just press Calculate
again until you get a reasonably consistent
answer.
Example
You have a 2 Stage
rocket made from standard pop bottles
with a crushing sleeve sustainer
deployment system based upon 15mm o/d
pipe with an experimentally
determined release pressure of 45 psi
and want to see how high it will go
at 95psi with water and air.
Load the data into the computer model
and save the two files.
Press 2 Stage. Load the Booster and
Sustainer files by clicking on the
Select buttons or the file name
labels (clicking on the file name
label when a file name is not loaded
will let you select a file and load
it in the same way as clicking on
Select whereas clicking on the label
when a file name is loaded will just
load that file).
Type in 15mm as the diameter and 45
psi (or 3 Bar) as the amount by which
the pressure has to fall. To start
with, we want to find an optimum
sustainer nozzle diameter and weight
so make those two boxes checked,
putting 220g in as the minimum
sustainer weight (we can't go lower
than this because the real thing is
this heavy).
Choose 10ms as the time slice and
press Calculate. The height results
for each iteration are: 491.68 feet,
429.25 feet, 523.37 feet, 515.89 feet
and 515.89 feet.
The rocket weight had reached its
minimum of 220g so this figure can be
removed from the calculation to speed
things up.
The nozzle diameter for the last
sustainer calculation was 4.19mm. In
stock, there is 4.5, 5.5 and 6.5mm
i/d tubing so I shall choose 4.5mm as
the nozzle size thus removing another
set of calculations.
Press Done and the Sustainer is still
loaded (check the label and the file
name at the top of the screen). Enter
4.5mm as the nozzle diameter (220g is
already in as the weight) and Save
the file.
Press 2 Stage again and uncheck the
Optimise Nozzle Diameter and Optimise
Rocket Weight checkboxes.Press
Calculate and you should get: 515.57,
506.65 and 508.38 feet (pressing
again will get the same result)
To view the booster and sustainer
files, just click on the appropriate
file name.
| Booster
Water Weight - |
2407 |
g |
| Sustainer
Rocket Weight - |
220 |
g |
| Sustainer
Water Weight - |
1336 |
g |
| Sustainer
Nozzle Diameter - |
4.5 |
mm |
So, for 95 psi, the
effective water weights are 2400g for
the booster and 1350g for the
sustainer giving a height of around
500 feet.
|
|
|
Booster |
| |
 |
Rocket |
|
|
|
|
| |
|
Mass |
350 |
g |
|
|
| |
|
Capacity |
6150 |
cm3 |
|
1 |
| |
|
Diameter |
11.5 |
cm |
|
|
| |
|
Coeff
of Drag |
0.77 |
|
|
2 |
| |
|
Nozzle
Diameter |
21.75 |
mm |
|
|
| |
|
Launch
Tube |
|
|
|
|
| |
|
Length |
25 |
cm |
|
|
| |
|
External
Diameter |
21.5 |
cm |
|
|
| |
|
Wall
Thickness |
1 |
mm |
|
|
| |
|
Length
of tube empty |
25 |
cm |
|
|
| |
|
Distance
of vent from end |
0 |
cm |
|
|
| |
|
Initial |
|
|
|
|
| |
|
Mass
of water |
1500 |
g |
|
3 |
| |
|
Pressure
in vessel |
95 |
psi |
|
|
|
Sustainer |
| |
|
Rocket |
|
|
|
|
| |
|
Mass |
250 |
g |
|
|
| |
|
Capacity |
4100 |
cm3 |
|
4 |
| |
|
Diameter |
9.5 |
cm |
|
|
| |
|
Coeff
of Drag |
0.54 |
|
|
5 |
| |
|
Nozzle
Diameter |
12 |
mm |
|
6 |
| |
|
Initial |
|
|
|
|
| |
|
Mass
of water |
1000 |
g |
|
3 |
| |
|
|
|
|
|
|
| Notes |
|
| 1 |
Two
3 litre bottles |
| 2 |
2
stage rocket |
| 3 |
A
guess at 25% fill |
| 4 |
Two
2 litre bottles |
| 5 |
Between
Tapered Skirt and Tapered
Rear Half |
| 6 |
Internal
diameter of sustainer
nozzle pipe |
|
|
Copyright
©2000 Paul Grosse. All Rights Reserved