 Woods/Scrader Woods/Scrader
This is a small brass adaptor (right)
that comes with two one way valves in a kit. It
is useful because one end of the inside is tapped
so that you can screw the one-way valve in or
have it as a nozzle.
|
|
 Tyre
Valve Tyre
Valve
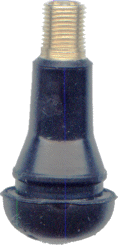
The Tyre Valve (right)
is probably the most globally available option.
 The inner
valve assembly (left) can be unscrewed,
leaving a straight-through nozzle although it is
smaller in diameter than the hole down the centre
of the Woods/Schrader. This option does, however,
produce a better connector for pressurising
bottles for heat moulding. The inner
valve assembly (left) can be unscrewed,
leaving a straight-through nozzle although it is
smaller in diameter than the hole down the centre
of the Woods/Schrader. This option does, however,
produce a better connector for pressurising
bottles for heat moulding.
|
| |
| To make the
connector, (ie, with the one way valve)
you will need to add the valve one the adaptor
assembly you are making is in place. |
|
To make the nozzle,
you will need to remove the valve assembly from
teh tyre valve before you put it in place. |
| Connector/Nozzle The connector/nozzle is a dual
purpose device that exists in two forms: a
straight-through nozzle and a valved adaptor.
The former allows the rocket to
be launched and enough thrust is developed to
lift smaller rockets and the latter (making
use of the valve) allows you to presurise a
bottle and then disconnect the bottle from the
air supply so that you can modify its shape
carefully using heat.
|
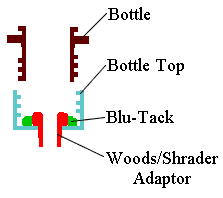
| The nozzle is made from the
bottle top and a Woods/Shrader adaptor, sealed
with a bit of Blu-Tack (one of these sticky
gunge things that you use for sticking posters to
walls and so on). |
|
The nozzle is made from the
bottle top and a Tyre Valve assembly. You will
have to remove the one-way valve to allow water
to flow through it. |
| |
| To make the connector, make a
central hole in the bottle top (the little
pimple in the centre of the top - an artefact of
the injection moulding process - shows you where
the dead centre is) such that the external
thread on the adaptor will screw into it (the
diameter of this hole needs to be a little less
than the outside dianeter of the thread - a tight
fit is better than a loose one) roughly 7
mm. It is reasonably important that the hole is
central and runs perpendicular to the surface of
the bottle top - that is it should run axially to
the bottle in order to provide a well directed
jet of water. How you will make this hole depends
upon what you have access to. . . |
|
To make the connector, make a
central hole in the bottle top (the little
pimple in the centre of the top - an artefact of
the injection moulding process - shows you where
the dead centre is) such that the gap
between the hemispherical end and the rest of the
assembly will fit through the hole you are
making. How you will make this hole depends upon
what you have access to. . . |
| |
| A sharp kitchen
knife (such as a vegetable peeler) or a
penknife may be used and will cut a good enough
hole as will using a sharp drill (remember
that the bottle top is soft) and finishing
off the hole using a taper-reamer. It may take a
few tries at this - I found that a sharp knife
was good at slicing through towards one side. |
| |
Make a ring of
Blu-Tack (or one of those plumbing sealant
compounds - you need less than a gramme) and
put it around the hole on the inside of the top
and then screw the adaptor (right) into
the hole in the top (as per the diagram above)
so that the Blu-Tack (or whatever you used)
forms a seal. If you used a flexible sealing
compound that sets, now is the time to let it set
but first, you need to make sure that the bottle
can screw onto the cap and still leave a gap
between it and the sealant.
You will probably find that a
finger and thumb don't provide a good enough grip
on the adaptor to tap the hole the first time
that you screw it in. You can solve this either;
by tapping the hole from the outside (where
you will have a good enough grip),
unscrewing the adaptor and then screwing it in
again from the inside; or, by using a pair of
pliers. Whatever you do, make sure that the
adaptor goes in as straight as it can. Any
deviation from axial will make the rocket fly in
a loop.
|
|
Simply push the tyre valve into
the hole and it is ready to use. |
| |
|
|
| If the top has a
separate seal, cut a hole in that so that it will
fit into the cap. |