An idea based upon
the Copper Tube Launcher
This
launcher comes from an idea from the following
email extract.
Subject: Single hose Launcher


I am building my launcher.


I wanted something elegant, so all I want between my air bottle

and the launcher is a single air line.


I am using copper plumbing fittings for the business end, Bosch

air line fittings for all the rest and a scrap SCUBA regulator

that I can tweak to whatever pressure I want 30 - 200psi+


I am building the launcher to have a single air line to the

business end. The effect is to pressure the rocket, then

depressurise the fill line with a valve at my end. That will

(with the aid of a non return valve and an air piston) allow

the pressure in the rocket to activate the piston which releases

and then let it fly.
A solution
 This (when
it is built) will allow the pressurisation of
the bottle and then release on depressurisation of
the air supply line. This (when
it is built) will allow the pressurisation of
the bottle and then release on depressurisation of
the air supply line.
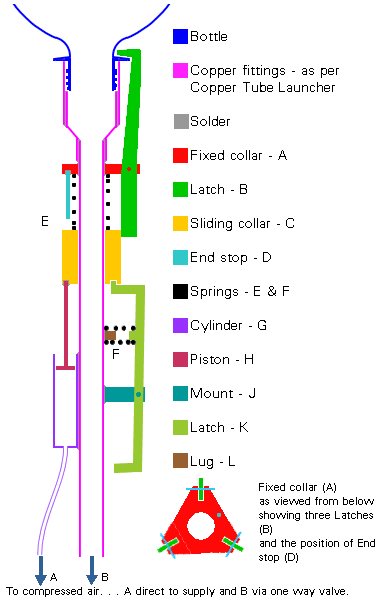
The diagram on the left shows the basic parts of
the Copper
Tube Launcher with the additional
fittings that make it all function from one air line
and the bottle in position (note that the 'o'
ring and fins et cetera are omitted).
Construction
The copper parts (purple) are assembled as
described on the Copper
Tube Launcher page but omitting the
cable ties, the copper ring and Jubilee clips that
secure them and the plastic sleeve. The rest is as
follows . . .
Fixed collar (a) is built to hold three of the
latches (b) as shown in the smaller diagram at the
bottom. There are three pins that secure the latches
(b), allowing them to move freely. The fixed collar
(a) can be made from 6mm brass or copper and the
latches (b) from 3mm brass. The fixed collar (a)
should be soldered onto the copper pipe and then end
stop (d) is soldered into a hole made in fixed collar
(a). End stop (d) can be made from 3mm brass rod but
it should be remembered that it must be able to
withstand the force from piston (h) at the highest
pressure to be used.
Next slide spring (e) onto the copper pipe
followed by sliding collar (c) which should slide
freely. Into the bottom of sliding collar (c) are
drilled two holes - one for piston (h) and one for
the end of latch (k). Piston (h) should be soldered
in place such that it is able to move up and down
cylinder (g) freely. Cylinder (g) is soldered onto
the side of the copper tube as is mount (j) - they
may be mounted together. Mount (j) is positioned such
that the end of latch (k) locates in a hole in the
end of sliding collar (c) and allows for the
disengaging of latch (k) and sliding collar (c) when
sliding collar (c) moves upto and meets end stop (d).
Lug (l) is positioned such that it holds the spring
(f) in place on the side of the tube.
Spring (e) needs to be strong enough to overcome
the almost neglegable friction force when latch (b)
is holding a pressurised bottle in place.The cylinder
(g)'s diameter needs to be great enough in order to
compress spring (e) at the lowest working pressure
used in addition to any frictional force derived from
pushing sliding collar (c) along the tube and,
disengaging the end of latch (k). The length of end
stop (d) should be such that it allows enough
movement to disengage the end of latch (k) whilst
starting from a position of holding closed the
latches (b).
Use
| 1. |
With latch (k) disengaged
from sliding collar (c) which is slid down
the copper pipe so that latches (b) are open,
put the bottle in place, making sure that any
seals are positioned correctly and that the
water is at the correct level. Hold latches
(b) in to grip the flange on the neck of the
bottle and slide sliding collar (c) against
the pressure of the spring (e). Holding
sliding collar (c) in place, push latch (k)
against the spring (f) and allow sliding
collar (c) to locate itself. This should now,
all hold in place on its own. This is the
position depicted in the diagram above.
At this point, make sure any tapes holding
parachutes and so on are where they should be
(on the rocket or in your pocket).
|
| 2. |
Increase the pressure in the
compressed air delivery line. Air should pass
through the one-way valve into the bottle and
also go into the cylinder (g) and start to
press against piston (h). As the pressure
increases, there comes a point when there is
sufficient force against piston (h) to move
sliding collar (c) against the spring (e)
upwards to meet end stop (d). During this
travel, the end of latch (k) becomes
disengaged from the hole in sliding collar
(c) and spring (f) pushes it out of the way.
The launcher is now armed and pressure should
be increased until it is at the required
level.
|
| 3. |
To release the rocket, lower
the air pressure in the air line. The one way
valve will stop any water from leaking back
down the delivery pipe. On lowering the
delivery pressure, the force acting on piston
(h) is reduced and the force stored in spring
(e) pushes sliding collar (c) down the copper
tube. When the sliding collar (c) clears the
ends of latches (b), the slight angle of the
faces that are in contact with the bottle
provide enough force to push them out of the
way thus launching the bottle.
|
Esoteric
Warning
If you are experimenting with different gasses in
order to find the effects of the ratio of specific
heat capacities of the gas at constant pressure and
constant volume ( Gamma
or compressability) on performance and are
considering gasses with a low, you should
not use Acetylene (it is dangerous enough gas as
it is) NEVER PUT ACETYLENE
IN CONTACT WITH COPPER. Try looking only at
gasses with a high such as
Argon. Gamma
or compressability) on performance and are
considering gasses with a low, you should
not use Acetylene (it is dangerous enough gas as
it is) NEVER PUT ACETYLENE
IN CONTACT WITH COPPER. Try looking only at
gasses with a high such as
Argon.
Thanks to
Jonathan Edge for writing to the group.
 Back to the Launcher Index Back to the Launcher Index
Back to the Water Rocket Index
|