The Copper Tube
Launcher
This is
the launcher that I have built using parts that I
have managed to find in the UK - a drier
alternative to getting soaked with hand-held
launches. This design does not have a central
launch tube and, to be quite frank, I have found
that it does not need one although there is
nothing to stop you from putting a rod down the
pipe in order to act as a guide.
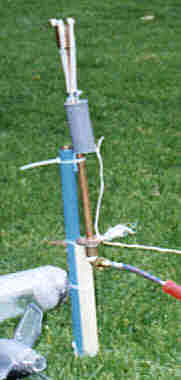
This is the basic launcher - you can attach it to
whatever you find convenient 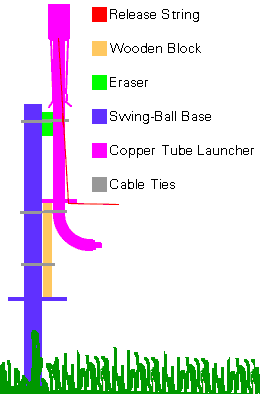 (Just to try it out, I
first tied it to a SwingBall base - right). Like
many launchers, it is loosely based upon the Clark Cable Tie Launcher although
this design offers a slighly higher pre-launch force
for a given pressure allowing heavier rockets to be
launched than other designs. (Just to try it out, I
first tied it to a SwingBall base - right). Like
many launchers, it is loosely based upon the Clark Cable Tie Launcher although
this design offers a slighly higher pre-launch force
for a given pressure allowing heavier rockets to be
launched than other designs.
By using an extrnal seal, it offers 28mm diameter
instead of 21mm - an increase in
area (and therefore force and thus maximum
lift-off weight) of 78% should
you ever need it.
The reason for choosing this method of sealing
over the internal method is entirely down to the
materials that I could find and was not based upon
some superior intellectual process - the thought of
extra force never entered into the design
specification.
Design
Considerations
By no means an exhaustive list - it should be . .
.
- slim enough to fit inside any sets of fins or
tube fins;
- long enough to fit inside any skirt;
- made from materials that are available or
have equivalents worldwide;
- easy to make;
- easy to use; and,
- as safe as is reasonably pricaticable.
Parts
These items are for the launcher itself - I
eventually tracked down the pieces I wanted at
Coussins Homestyle at 271 Blagreaves Lane in
Littleover Derby UK (+44 (0)1332 768 177). If
you want to design a launcher for yourself, walk
around with the neck of a bottle in your pocket and
be prepared for some disbelievers.
You decide what you want to attach it to (To
try this launcher out the first time, I used the bit
of a SwingBall that sticks into the ground and
secured it with cable ties. 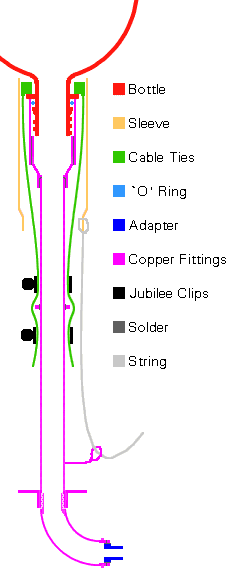 There is nothing to stop
you from building a tripod like device, a sledge
stand or fixing it to a table as long as it meets
your needs of transportability - the flange on the
mounting bracket will help you do this). There is nothing to stop
you from building a tripod like device, a sledge
stand or fixing it to a table as long as it meets
your needs of transportability - the flange on the
mounting bracket will help you do this).
- Through-Wall Outside Tap Mouting Bracket
(essentialy a piece of copper pipe with a
useful flange and thread at one end);
- 28 - 15mm End Feed Connector;
- 28mm Straight End Feed Connector;
- 90º ½" BSP - 15mm Compression Tap
Connector;
 Woods/Schrader
adapter; Woods/Schrader
adapter;- 14 SWG Copper Wire;
- Solder and Flux;
- Plumber's PTFE tape;
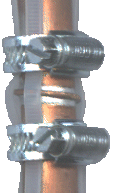
- ½" x ¾" Jubilee Clips (also
called variously worm or gear-drive hose
clamps or screw clips or screw clamps in
various parts of the world);
- 200mm Cable Ties (or you can use 20 x
100mm cable ties);
- 3" of 38mm ID plastic sleeving (plastic
drain pipe);
- 21mm dia 'O' Ring; and,
- piece of string (about 20 yards or
whatever you feel safe with).
Construction
Make a copper ring from the copper wire, clean it
so that it can solder and slide it over the
through-wall tube (this one will fit near the
middle). At this point, you can also slide the
two jubilee clips onto the tube but don't worry if
you forget this bit as they can be uscrewed and slid
over later.
Solder the 28 - 15mm connector to the tube and
then the straight end feed connector on to that in
order to make the top of the launcher as shown in the
diagram.
Find a suitable point on the through-wall tube for
the copper ring such that the cable ties may be
gripped above and below with the jubilee clips (with
the 100mm cable ties, this needs to be around 1cm
from the bottom of the 28 - 15mm connector).
Clean the copper tubing at this point and sweat the
copper ring on. This will form a stable base that
will not slip at all.
 Slide the plastic
sleeving over the end and slide down to the bottom,
bringing the jubilee clips to the copper ring. Fit
between 4 and 8 cable ties and secure them (oriented
as in the diagram) such that they will grip the
flange of a pop bottle placed in the end of the tube.
If you use the 100mm cable ties, use all 20 and use
an elastic band to assist in lining them up - putting
the elastic band over the 28mm connector and sliding
them through it. Tighten the jubilee clips being
careful not to cut the cable ties as you do it. Slide the plastic
sleeving over the end and slide down to the bottom,
bringing the jubilee clips to the copper ring. Fit
between 4 and 8 cable ties and secure them (oriented
as in the diagram) such that they will grip the
flange of a pop bottle placed in the end of the tube.
If you use the 100mm cable ties, use all 20 and use
an elastic band to assist in lining them up - putting
the elastic band over the 28mm connector and sliding
them through it. Tighten the jubilee clips being
careful not to cut the cable ties as you do it.
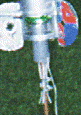 Slide the plastic
sleeve up the tube so that it grips a bottle - you
may have to shave a little off the outside of the
cable ties so that it only requires a minimum of
force to pull the sleeve down on launch so don't
force anything at this stage (this launcher (like
many others) is designed so that it will fit inside
the skirt of a rocket without getting in the way -
see photograph). Once the sleeve moves
reasonably freely, check to make sure that the ties
will hold about 50lbs weight. Make a hole in the
sleeve and pass a short piece of string through it to
which you can tie a longer piece at the launch site (using
a short piece means that when you are assembling the
thing in sub zero temperatures, you are not trying to
thread a piece of rapidly fraying string through a
tiny hole in a piece of plastic while everyone looks
at you struggling). Slide the plastic
sleeve up the tube so that it grips a bottle - you
may have to shave a little off the outside of the
cable ties so that it only requires a minimum of
force to pull the sleeve down on launch so don't
force anything at this stage (this launcher (like
many others) is designed so that it will fit inside
the skirt of a rocket without getting in the way -
see photograph). Once the sleeve moves
reasonably freely, check to make sure that the ties
will hold about 50lbs weight. Make a hole in the
sleeve and pass a short piece of string through it to
which you can tie a longer piece at the launch site (using
a short piece means that when you are assembling the
thing in sub zero temperatures, you are not trying to
thread a piece of rapidly fraying string through a
tiny hole in a piece of plastic while everyone looks
at you struggling).
Make another copper ring from copper wire - with a
square cross-section (this one will join the
Woods/Schrader adapter to the 90º connector).
make it so that it fits around the knurl of the
adapter and sweat it on. Then sweat it onto the end
of the 90º connector. Using plenty (just the
right amount) of PTFE tape, screw the 90º
connector into the through-wall tube.
 Put a rubber 'o'
ring onto the bottle so that it sits in the groove.
Screw on the flexible hose and the bicycle pump in
the usual manner. Fill the launcher and the bottle
completely with water, sitting the bottle in position
as shown in the diagrams. Put a rubber 'o'
ring onto the bottle so that it sits in the groove.
Screw on the flexible hose and the bicycle pump in
the usual manner. Fill the launcher and the bottle
completely with water, sitting the bottle in position
as shown in the diagrams.
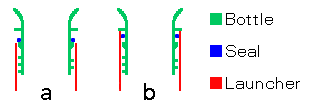
Note that you should slide the 'o' ring to the
thread end of the groove (a),
and when you slide the rocket onto the launcher, the
'o' ring rolls up the groove slightly (b).
This means that when the rocket launches, all that
the rocket has to do is roll the 'o' ring back and
this means that the seal is not sliding over any
surface and therefore should last longer.
 Now pressurise
the bottle to working pressure and check for leaks.
If you have done the soldering properly and
everything matches up, there should be none. Unscrew
the hose connector and the system will depressurise. Now pressurise
the bottle to working pressure and check for leaks.
If you have done the soldering properly and
everything matches up, there should be none. Unscrew
the hose connector and the system will depressurise.
Fix the flange on the Tap Mouting Bracket to
either a stake, at base that rests on the ground or
to a tripod type of stand.
Use
This assumes that you have pressure tested
everything.
- Put the launcher in place (making sure
that it launch tube is vertical -
non-vertical angles lead to internal
waves and unpredictability in flight)
and lay out the string (it may pay you to
add an extra yard at the rocket end so as to
warn you that your kids are going to launch
it while you are still pressurising it -
giving you enough time to put your foot on it
or run. Another alternative is to have a hook
and eye about a yard from the launcher - only
linking the two when you are ready thus
precluding your offspring's attempts at
entertainment) passing it through a loop
(in the base so that pulling it from a
distance pulls it downwards - you can have a
pulley or wire loop, just as long as it pulls
downwards) making sure that it will be
able to move freely (try it a few times
just to make sure).
- Connect the pressure hose and then fill the
launch tube with water. Put the correct
amount of water in the rocket and quickly
mount it on the
 launch tube
making sure that the 'o' ring is in place (if
you want, you can overfill the rocket
slightly, pump a little bit of air into it
and then let out water until it is down to
the correct level by unscrewing the pressure
fitting) and then slide the plastic
sleeving up to lock it in place. launch tube
making sure that the 'o' ring is in place (if
you want, you can overfill the rocket
slightly, pump a little bit of air into it
and then let out water until it is down to
the correct level by unscrewing the pressure
fitting) and then slide the plastic
sleeving up to lock it in place.
- Pump air into the bottle until it is at the
right pressure (remembering that you will
have a slight back pressure on the one-way
valves). Remember
- do not touch the rocket when it is
pressurised.
- Walk away to the end of the release string.
- Ensure that everyone who is close enough to
need to know what is going to happen next
actually knows that you are about to launch
and then pull gently on the release string.
Launching from a distance gives things a different
perspective to launching by hand.
 Variations Variations
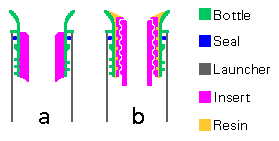
As this launcher does not have any launcher parts
on the inside of the nozzle such as seals or launch
guide tubes and the thread of the bottle is not being
used for anything structural, (you can remove it
if you really want to see if it makes any difference,)
it is possible to insert a threaded device into the
nozzle so that you can experiment with defferent
sized nozzles.
An insert that screws into a thread that is tapped
into the inside of the nozzle is shown in a
although it must be remembered that even though this
is not a load-bearing part of the bottle, tapping the
inside may weaken the neck of the bottle and may
provide an opportunity for cracking under pressure. b
shows a threaded sleeve that is glued into the neck
of the bottle with resin - the sleeve being able to
take a number of nozzles for the purposes of
experimentation. Possibly a
and definately b
require some engineering capability such as a lathe.
Another variation is to add some extra hardware so
that it is controlled entirely by one compressed air
line. Look at the page showing An idea based upon
the Copper Tube Launcher.
Note
You may find that with different sized bottles
with different shaped flanges and grooves, the 'o'
ring slips at very high pressures, moving to the top
of the groove and, as a result, water may start to
leak out. This can be combatted by using 2 'o' rings
instead - the one nearer the flange stopping the
first one from shifting.
Esoteric
Warning
If you are experimenting with different gasses in
order to find the effects of the ratio of specific
heat capacities of the gas at constant pressure and
constant volume ( Gamma
or compressability) on performance and are
considering gasses with a low, you should
not use Acetylene (it is dangerous enough gas as
it is) NEVER PUT ACETYLENE
IN CONTACT WITH COPPER. Try looking only at
gasses with a high such as
Argon. Gamma
or compressability) on performance and are
considering gasses with a low, you should
not use Acetylene (it is dangerous enough gas as
it is) NEVER PUT ACETYLENE
IN CONTACT WITH COPPER. Try looking only at
gasses with a high such as
Argon.
Thanks to
(in alphabetical order) Alistair Bell,
Brad Calvert, John Darbyshire and T. Nazim with
the international nomenclature and Mark Branigan
with the offer of parts for this project.
 Back to the Launcher Index Back to the Launcher Index
Back to the Water Rocket Index
|