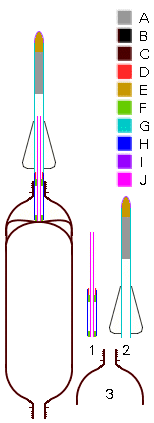
Materials The dart has to be capable of withstanding an acceleration of between 100 and 210G (yes, that is 2 kilometers per second per second, making the 60g dart put a 12.5kg force on the launcher) so it needs to be fairly strong. I opted to make it from 21.5mm white uPVC overflow pipe. The target weight for the dart is between 60 and 80g so this was fairly easy. The materials list is as follows . . .
Construction Dart First, cut around 25cm of the 21.5mm o/d uPVC pipe using the pipe cutter and then clean the end burrs using the knife. Next, push around 1cm of the cork into the end of the pipe you have just cut and then, using the knife, cut the end of the cork to form a rough, elliptical form, using the pipe as a handle. Try to get roughly the right shape and finish up with the file or grater. Once you have got it right glue it in place with super glue - this is where the fun starts. You are now going to make a high technology cellulose and polymer composite material to cover the nose cone (this is rocket science). Tear strips of paper, approximately 5mm by 3cm (roughly 0.25" by 1.5") such that all four edges of the strip are torn - that is to say that the transition from full thickness to edge is gradual over around 1mm. Put some super glue on the strip and stick it onto the cork, wrapping it around the exposed cork and pressing it into place. NOTE, I used my thumb to do this and I found that if I kept it moving on the surface, my thumb did not stick to it - when you come to the end of each smoothing action, lift your thumb before it stops on the surface, otherwise it will stick to it. Dab glue on the edges where the paper has not stuck down to the cork, pressing down and keeping your finger moving. Repeat this process until all of the cork is covered with paper and glue. Then, hold the sand paper in one hand and roll the dart along your thigh (as you sit), sanding the corners off the plastic/paper composite nose cone (imagine you were rolling a Cuban cigar - not that I ever have). An alternative to this is to put it in a lathe (but I haven't got one). Repeat this process - adding a layer of paper and then sanding - until a smooth nose cone is formed. It may start off a bit knobbly but after a while, you will get a smooth elliptical nose cone to be proud of. After your final sanding, apply one further layer of superglue to make a nice smooth finish. You should now have a smooth, well shaped nose cone on your dart and a thick (0.3mm (ish)) layer of superglue on your thumb. Superglue this thick comes off (relatively) easily so a soak in some warm water and some teasing over a few minutes with a spoon handle should get rid of almost all of it (like dealing with superglue at any other time - the rest will wear off in a few days ;-).
After this, put some masking tape around the dart body, just behind the nose cone and paint the nose cone red, pealing off the masking tape before it dries so that you end up with a smooth transition again. Next, weigh the dart and then set it upright so that it is pointing down and can be left for a while. Light a candle and drip molten wax into the dart, weighing it occasionally, until it weighs enough. Let it set until the dart is cold to the touch and then drop some super glue down the inside (10 to 20 drops so that it bonds with the uPVC pipe and forms a layer or ledge that will stop the wax from falling out on acceleration. Wax is cheap, availble world-wide and dense enough for this purpose. If you want to concentrate the extra weight towards the nose cone by using lead shot then you will need something that is stronger than wax. Epoxy resing should do the job well enough. Your dart is now ready. Connector The connector has to be able to transmit over 12 kilogrammes force from the top of the rocket pressure vessel to the bottom of the dart. Fortunately, the top of the pressure vessel in the centre is pretty strong and by using a piece of pipe the same diameter as the dart, all of the force is transmitted directly. An additional requirement is that the dart should separate easily, as soon as the booster starts to slow down. With this in mind, I came up with the following . . . I cut off the top of a 2 litre PET bottle so that it could slide over the bottom of another 2 litre bottle, forming a neat holder. I cut roughly 8cm of 21.5mm uPVC using the pipe cutter and deburred the ends using the sharp knife. This pipe fits snuggly into the top of the 2 litre PET bottle, the nozzle of which holds the pipe straight - being essentially cylindrical, stopping the pipe from rotating away from the axis of the bottle. Then, I cut roughly 1cm of the 19mm diameter pipe and slid that into the end of the uPVC pipe so that around 1.5mm protruded, forming a ledge that would stop the dart from slipping out of its location. This was then glued into place and sanded slightly so that the dart was a loose fit. Then I cut two 1cm lengths of white uPVC pipe and one of the 19mm Halloween pipe, cutting a piece out of the side of each so that they could form a narrower cylinder. I then rolled these up, putting a uPVC ring inside the piece of Halloween pipe that forms a ledge and a piece of each at the other end of the pipe so that they were flush with the bottom of the pipe. I then cut a 20cm length of the 15mm pipe, deburring it with the knife and sanding one end. Next, I pushed this through the end with the ledge and to the other end, until it was also flush. This now allows the dart to sit on top, with the 15mm pipe forming a support that holds the dart in place around half way up and the black pipe at the bottom so that it doesn't slide off sideways. The connector slides through the nozzle of the top of the 2 litre PET bottle so that it can be taped in place and the connector slid through, making contact with the end of the pressure vessel as in the diagram above. Note that the uPVC is not glued into the neck of the bottle - this is because as the force on the connector increases during the launch, it could cause the bottle to buckle if it was glued. By allowing it to move inside the neck, the bottle only puts a sideways, straigtening force on the connector. With the connector in the nozzle of the top of the bottle that I had cut, I positioned the the top of the bottle so that the rocket was straight with the sides (and, as this is an unmodified bottle, therefore with the nozzle as well) and then taped it into position. The booster rocket does not need fins because there is no opportunity for the dart to experience any significant effect - it is doing 60mph after just over 1/40th of a second. Water Using a 2 litre bottle (with connector + bottle weighing in at a total of 90g) and a 60g dart, the computer model gives the following predictions (velocities have been rounded to the nearest 5) . . .
I have included in the table, the weight of the dart under the maximum acceleration of the rocket to give an idea of the forces involved and how strong the connector between the booster and the dart needs to be. This dart has no recovery system and it is capable of travelling over 500 feet into the air, therefore great care must be taken to make sure that the rocket is launched vertically. The simulator shows that at an elevation of 42 degrees, the dart has a maximum range of around 280m (over 300 yards) at 140 psi, using the same amount of water; and a range of nearly 100m (109 yards) at 80 degrees elevation under the same conditions. It hits the ground at around 46m/s (105mph), therefore, make sure that everyone who may be affected by the launch knows what to expect. Launching onto a hard surface will obviously cause damage to the rocket so choose a soft surface (such as a soggy football pitch). In addition to this, it is in the air for a long time and therefore should be launched in calm/still conditions so that the air that the dart is launched into is still on-site by the time it lands. When I tested it at 100 psi, the 60g dart landed in the side of a grassy hill and it went into the ground to a depth of 6" (150mm - the weather had been very wet). Knowing that the velocity of the dart on impact was around 42.7m/s and using equations derived from . . .
it is possible to calculate the value of the deceleration and the time that it took (assuming that the deceleration was smooth).
At 140 psi, the deceleration works out to be around 740G if the stopping distance is assumed to be the same. Finding the dart in the grass was difficult, so a radio transmitter onboard would have been a good idea except that anything that the dart carries has to be able to withstand accelerations of 740G and beyond. It goes without saying that landing on a harder surface would give a higher value for the deceleration. The calculations reveal a surprise which is as follows:-
|
||||||||||||||||||||||||||||||||||||||||||||||||||||||||||||||||||||||||||||||||||||||||||||||||||||||||||||||||||||||||||||||||||||||||||||||||||||||||||||||||||||||||
|
||||||||||||||||||||||||||||||||||||||||||||||||||||||||||||||||||||||||||||||||||||||||||||||||||||||||||||||||||||||||||||||||||||||||||||||||||||||||||||||||||||||||

 Once your thumb is clean (or while your
assistant is cleaning his or her thumb), you can cut out
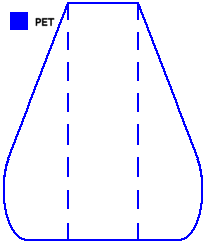
the fins (as per the sketch on the right - around 10cm
long) with a pair of scissors, fold the PET on the dashed
lines and then make a smooth curve the other way between
the dashed lines - in this way, it follows the curve of
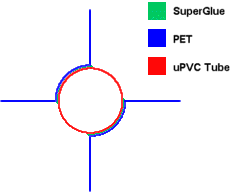
the uPVC tubing and the fins stick out at 90 degrees to
the dart body. Carefully glue them into place with
superglue (as per the sketch on the left).
  Note that the dart does not hold any pressure
so superglue is okay on it.