Circular Nylon
Parachute
If a job
is worth doing, it is worth doing well and making
a circular nylon parachute will give you skills
in cutting and sewing nylon as well as a good
quality chute that will last (you can wash
this one if you really want to).
Materials
and equipment
For this parachute (and its drogue),
you will need . . .
- four feet of nylon fabric (be
adventurous - go for bright red);
- a reel of thread of the same colour;
- a glue stick;
- around 20 metres of light nylon cord;
- a mug of cold water;
- a soldering iron;
- a small open flame (like a candle);
- a sewing machine;
- 2 plastic rings (about 2cm diameter);
and,
- 0.3m elastic cord.
Shroud
Lay the nylon  fabric on the floor and
then pick it up from a point that is halfway
between the sides that are closest together and
the same distance from one of the other two sides
(where the green lines cross on the diagram).
By doing this, you will get the largest area (outlined
in blue) and have the most spare to make a
drogue chute.Mark this point with a cross. fabric on the floor and
then pick it up from a point that is halfway
between the sides that are closest together and
the same distance from one of the other two sides
(where the green lines cross on the diagram).
By doing this, you will get the largest area (outlined
in blue) and have the most spare to make a
drogue chute.Mark this point with a cross.
Then, use a piece of string, the
same langth as your radius, to mark out sixteen
points at equal intervals (on the imaginary
blue line). Then, join them by drawing a
straight line with a pen, using a ruler to make a
regular, sixteen sided polygon. At each of the
sixteen points, make sure that the line that you
have drawn, extends around 1" towards the
centre of the shroud. Next, put a mug in the
centre of the shroud and draw around it. You now
have a polygon, marked in ink and ready to cut.
Repeat the bove process on a
smaller section - around 1.5 feet in diameter
- for the drogue.
If you cut nylon with scissors,
you will produce an edge that will fray given
half a chance. Cutting nylon with something hot
gives a good, seals edge that is very resistant
to fraying - in addition, it is quicker and
easier to cut nylon in this way.
Lay out the nylon shroud and run
the hot soldering iron along the lines that you
have drawn. If you make sure that the nylon is
not in contact with a heat dissipating surface
such as a metal sheet, it will cut quickly. If
you press the nylon down so that it is in contact
with a metal sheet, it will take ages to do it.
When you have finished, you should have your main
and drogue chutes ready to sew.
Sewing nylon  is not
as bad as it sounds. The main problem is
that it does not stay folded and taking
the normal course of action and using
pins will lead to a time consuming drudge
that will seem to take forever. is not
as bad as it sounds. The main problem is
that it does not stay folded and taking
the normal course of action and using
pins will lead to a time consuming drudge
that will seem to take forever. On the left are the steps
that you need to take to make a good seam
for the centre hole in your nylon shroud.
You should get your skills on this bit
and the rest will be quite easy. On the left are the steps
that you need to take to make a good seam
for the centre hole in your nylon shroud.
You should get your skills on this bit
and the rest will be quite easy.
- Put the edge of the fabric on the
sewing machine (it doesn't
really matter which way around
you work - these diagrams just
show the way that I did it);
- Apply a
 smear of glue stick
to around one or two inches; smear of glue stick
to around one or two inches;
- Fold over the edge so that just
under the width of the seam goes
over (around 2mm for the hole
in the middle see how large the
thread is in comparison to the
width of the seam);
- Sew all the way around. Apply the
glue and fold over as you go -
even the glue won't hold it all
of the way around;
- Once you have done a complete
circle, apply glue again (to
between one and two inches of
seam);
- Fold over the length that you
glued; and,
- Sew all of the way around doing a
couple of inches at a time. You
will end up with a double stitch
on one side (picture)
and single on the other.
Tie off and you have your centre hole
made.
|
| |
 Next you need to sew around Next you need to sew around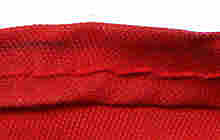 the outside
edges. the outside
edges.
- Again, place the fabric on the
flat bed of the sewing machine;
- Apply the glue-stick to one full
length of the outer edge;
- Fold over - around 4mm this time;
- Apply another smear of
glue-stick;
- And fold over again. Now you have
a length of triple thickness
nylon, glued together to form a
double folded edge;
- Sew.
Once you have completed one section,
repeat for the other fifteen.
Having completed the main shroud, you
can repeat the process on the drogue
chute. Having done that, soak the chutes in
warm water for a few hours to get rid of the
glue - doing this will make the seams more flexible.
|
Cords
 Take the nylon cord and cut off
roughly 2½ metres - placing this to one side. To
the remainder, fold it in half, then in half
again and so on until you have 8 lengths, just
over 2 metres long. Take the nylon cord and cut off
roughly 2½ metres - placing this to one side. To
the remainder, fold it in half, then in half
again and so on until you have 8 lengths, just
over 2 metres long.  Cut it into these lengths and seal
the ends by melting in a flame for a second or
two and then putting the melted end into the mug
of cold water (left). Instead of using a
knife or scissors, nylon can be cut by putting it
in a small flame thus automaticaly sealing the
ends. Cut it into these lengths and seal
the ends by melting in a flame for a second or
two and then putting the melted end into the mug
of cold water (left). Instead of using a
knife or scissors, nylon can be cut by putting it
in a small flame thus automaticaly sealing the
ends.
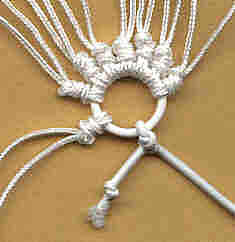
Take one of the eight pieces and fold in two,
forming a loop. Thread the loop through one of
the plastic rings and then pass the two loose
tails through this loop. Pull tight, tie a knot (not
to stop it from coming undone but just to provide
a bit of resistance) and repeat for the
other seven lengths. You should now have sixteen
ends coming from one plastic ring. Then tie the
elastic to the ring (as in the photograph)
- tying a knot in each end so as to stop fraying.
Now, make a smaller one with six or eight
cords around one foot long for the drogue.
 Assembly Assembly
Place the plastic ring in the
middle of the shroud and lay out the cords so
that they intersect the edge of the shroud at the
sixteen corners. Make sure that the cords are in
the order that they are on the plastic ring as
this will make it easier to sort out any tangles
that you may get into later on in the field.
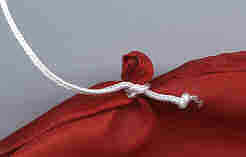
At each corner, pinch about 1cm
of the seam and tie a knot around it very
tightly. Then, just to make sure, tie another. In
the picture (right), you can see that
the end of each cord is also tied in a knot.
Repeat a further fifteen times
and then perform the same task on the drogue
chute.
On
to the Pictures . . .
 Back to
the Water Rocket Recovery Systems Index Back to
the Water Rocket Recovery Systems Index
Back to the Main Water Rocket Index
|