If a job is worth doing, it is worth doing well. Although this parachute takes a lot of trouble to make, it is very impressive and well worth the effort. Extra special thanks to Mauricio Cedaro in Argentina for helping me with this one. Materials and equipment For this parachute (and its drogue), you will need . . .
Shroud Go to the rib drawings page, save and print out the drawings making sure that the final scale is correct - 75dpi (the end rib should be between 60 and 70cm long). Glue the templates to a piece of cardboard (a Cornflakes Packet is just about right) and lay the nylon on top. You should be able to see through it to the pattern underneath.
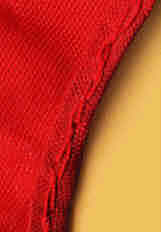
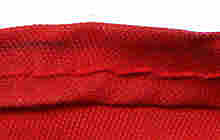
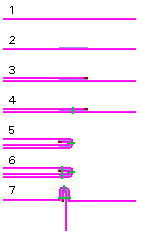
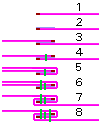
Mark To the leading edge of each of the inner ribs, fold over and sew (using sewing method 1 below) the edge (diagram 1). If you want to be ultra symmetrical (bear in mind that sooner or later, someone who should get a life will point out to you that all of the seams travel in the same direction and shouldn't they be symmetric?) make 4 of them go one way and 5 the other (it doesn't really matter which way). Likewise, to the leading edge, the lower leading edge, the bottom edge and the trailing edge of the end ribs (diagram 2), fold over and sew the edges (making sure to make the two end pieces mirror images :-) Then, do the same to the longer edges of the top and bottom sheets. Once you have done this, take one of the inner ribs (one of the five) and sew the upper edge to the centre line of the upper sheet (using sewing method 2) so that the front, upper corner of the rib meets the front seam of the upper sheet (which you, of course, remembered to have the folded edge on the lower side). You need only do the first stitch in the method as far as the end of the inner rib but continue the second stitch for the full length of the upper sheet thus making a small rib that runs the entire length (diagram 3). If you don't do this, the upper sheet will become curved and wrinkled. Also, be very careful not to stretch the fabric as you sew otherwise, the ribs will end up different lengths. Repeat this process for the other 8 inner ribs and then sew the upper edges of the end ribs along the full length of the sides using sewing method 3. You should now have something looking like diagram 4 (You are half way there). Next, using sewing method 2 and starting in the middle as you did with the upper edges of the ribs, sew the lower sheet to the bottom edge of the inner ribs (diagram 5) and then, once you get to the end, sew on the end rib (again using sewing method 2) along the line that follows the same profile as the inner ribs - this should give you an overhanging flap. Repeat this process working from the centre in the other direction and then, finally, just run the sewing machine along the trailing edge of the bottom sheet so as to form a seal with the top sheet at the trailing edge of each cell (diagram 6). Now, make 28 little tabs (~2cm x 0.7cm). If you number the ribs 0 to 10, make a mark in the four places on the underside (corresponding to fixing points A, B, C & D on the end rib plan on the rib drawings page) on ribs 0, 2, 4, 6, 8 & 10 and additionally in position D (trailing edge) on ribs 1, 3, 7 & 9. Sew the tabs onto these positions using the rib so that no extra aerofoil material is used up. You should put the tabs on ribs 0 and 10 (the end ribs) on the outside so that the flap will have the cords running on the outside of it. Now the parafoil shroud is finished. The next thing you should do is give it a good soak for a few hours in warm water to get the glue out. Sewing Methods
Cords The parafoil chute differs from the Again, the cord used is cut by holding it for a second or two in a small flame such as a candle and then solidifying any molten plastic by quickly immersing it in a mug of water so as to make a sealed end as in the blow-up on the left. The actual cord is only 1 or 2mm wide. The parafoil cords form four basic groups A
through to D
Cut 6 of each length, tying a loose knot near one end of the B cords (this is because they are so similar to the lengths of the A cords that if you don't take some steps towards identifying them, you will run a higher chance of confusing the two later on when it matters). In addition to these, make a further 4 cords of 40cm length (these are going to be the extra D cords that you will need) and a further 6 cords of 20cm length - these will tie the rings together in a meaningful way later on. With 7 rings and the shock cord, you are now ready to begin. Take the four sets of six cords, A, B, C & D and divide each into two sets of three cords so not you should have eight sets of cords. Take a D cord and hold one end with a 40cm cord, tying the two together at the end of the shorter cord (top and second diagrams on right showing D cords). Repeat this with the second D cord so that you have 2 doubles and one single D cords (at this point, I tied the D cords together loosly with four knots, the C cords with three, B cords with two and A cords with one knot. This made it easier to identify the groups during the procedures upto and including final assembly). Pass the single ends of the D cords through
one of the plastic Repeat this process with the other sets of
cords, tie on the shock cord (passing the
other end of the shock cord through a hole in a
bottle top and knotting it) and you are now
ready for final assembly. Assembly Put the parafoil chute on its back on the floor. Place a chair with its back to the chute such that the leading edge of the chute is next to the chair. One by one, starting in one corner (I would suggest starting with the leading edge cords A) undo any identifying knots and tie the ends of the cords to the tabs on the shroud being consistent with the amount of cord that you use for each knot. Remember to undo the extra identifying knots in the B set of cords. Also remember to keep left and right cord sets separate. When you get to the trailing edge cords D, remember that the two sets (on each side) of double cords go to the outer pairs so the single D cords go to ribs 4 and 6. Once you have finished this, the job is done - you have your completed parafoil chute. Phewhh!!! You should also make a drogue chute - the details for this are on the Circular Nylon Parachute page. Adjustment The trim of the chute can be altered by pulling or releasing the D cords on either side. You can make the decent slower by pulling them (making the length of the 20cm length of cord that secures ring 3 shorter by tying it off with the ring lower down) or you can make it travel in a spiral by trimming the sides differently - remember that shortening them too much could lead to the chute stalling. Alternatively, you can use a radio control to adjust them in flight. Packing This chute is not as obvious to pack as the circular chutes. Holding it up by the cords makes it want to concertina and then, you can zig-zag fold it like a circular chute. With plenty of talcum powder, I have found that this method does work but I am open to suggestions from anyone who knows better.
|
||||||||||||||||||||||||||||||
 Cut out 2 end ribs and 9
inside ribs using the soldering iron (making
sure that you keep the direction of the material
consistent). Measure the distance along the
top (continuous curved edge) of the end
rib and mark out a rectangle of nylon 106cm along
one side and the top distance (T) along the
other, cutting out with the soldering iron.
Repeat the process but this time using the
distance along the bottom of the aerofoil as the
distance (B) (the bottom of the inner rib),
again cutting out with the soldering iron.
 out each of
the two sheets with lines (in a water
washable pen) every 10.5cm so that you end
up with 10 bands, each 10cm wide with a 0.5cm gap
between.
 There are two ways of
doing this: a single step method and a double
step method. This is the double step method . . .
 smear of glue
stick;
 method
(slightly more difficult to do but quicker).
 on the flat bed
of the sewing machine;
 allows
you to join a second piece of material to the
first, part way along the first and in such a way
that with the thickness of nylon we are using,
there are no problems regarding left or right
handedness.
 triple
step method.
 which,
although is a lot more difficult to do, is a
little quicker (once you get the hang of it).
 with some
additional cords for the rear section D. There
are 6 cords of each length and I allowed 8 cm
extra for tying knots et cetera. The lengths are
as follows . . .
 rings (ring 2 on the bottom
diagram) and tie the ends to another plastic
ring (ring 3 on the diagram). To ring 2,
tie the ends of the C cords. To ring 1, tie the
ends of the B cords (opposite to the ends
with the identifying knots) and the ends of
the A cords (do these alternately A B A B A B
so that there is no overall twist on the ring when
it is eventually in tension). To rings 1, 2
& 3, tie a 20cm length of cord and then tie
the cords for rings 1 & 2 tightly to the
shock cord ring (ring 4) and the cord
from ring 3 (the trim for the parafoil)
loosely so that the ring sits approximately half
way between rings 2 and 4 (this is a a
reasonable starting point for the trim of the
chute). The loose ends of the cords used to
trim the chute can be seen in the picture on the
right of the underside and rigging pegged out to
dry on our washing line. Note the bottle top used
to fasten the shock cord to the top of the
rocket.