|
Recovery systems -
Nose Separates at Apogee
This is the
simplest method of deploying a parachute or streamer.
Unfortunately, it is also has a reputation for not being
particularly reliable unless you are careful to make it
so. This will be discussed here. Mounting the nose with
parachute onto the rocket is exceptionally easy in the
field with this method.
Design
This device is designed to be a separate unit that can
be attached to any suitably sized bottle. It is made from
one standard 2 litre bottle and will house any of the
parachutes or streamers.
The parachute can be packed and the rocket mounted on
the launcher as two separate procedures as the parachute
is connected to the rocket via a bottle top which can be
simply screwed on at the right time.
Manufacture
All that you need to build this is . . .
- One 2 litre pop bottle;
- Some gaffer tape;
- A soldering iron;
- Some sand paper; and,
- A pair of scissors.
 As
this procedure requires increased air pressure to
inside of the bottle, it must be done before any
cutting operations are performed on it. As
this procedure requires increased air pressure to
inside of the bottle, it must be done before any
cutting operations are performed on it.To
modify the nose cone (the bottom of a pop
bottle) in order to make is more
aerodynamically sound, you first of all need to
have the connector described on the connectors page.
Attach this to the bottle (as described on
that page) and pump up a fair pressure -
between 1 and 3 BarG.
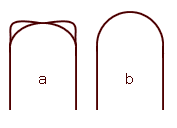
Unscrew the pump, leaving the hose (with
its one-way valve) in place and start to
rotate the bottle, holding the nose (a)
approximately 9" above a gas ring (for
those without gas rings, I have seen a barbecue
mentioned as an alternative although I have not
used one myself). After a while, the plastic
will have softened sufficiently to form a
hemispherical shape by itself (b),
at which point, you should cool it down under a
cold tap or in a bowl of cold water.
Remember that unlike the body of the rocket,
this structure does not have to withstand any
extreme pressure.
|
  Carefully Carefully
 mark out two rings on the pop bottle (about 1
cm apart, near the bit where the sides become
parallel). I have found a convenient way of
doing this by trapping a felt tipped pen in a
drawer and then holding the bottle at either end
whilst rotating it. Cut along the lines with a
pair of scissors. You now have all of the bits
that you will need.
mark out two rings on the pop bottle (about 1
cm apart, near the bit where the sides become
parallel). I have found a convenient way of
doing this by trapping a felt tipped pen in a
drawer and then holding the bottle at either end
whilst rotating it. Cut along the lines with a
pair of scissors. You now have all of the bits
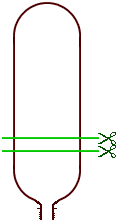
that you will need. Make a series of around 30
holes in the nose cone, on the straight portion
just where the curve of the nose finishes. There
is a low pressure area here and making around 30
holes in 2 lines around 1 cm apart will keep the
pressure inside the nose low enough to keep it on
the rocket until it gets to apogee. Note that the
PTFE sheet, if you are going to use one goes up
the inside almost as far as this but make sure
that it doesn't cover the holes.
|
 |
Now cut the
ring and tape it so that there is about 1
cm of overlap. Tape this to the neck of
the bottle top as shown in the diagram on
the left. (I have found that in most
cases, this ring is not needed but you
can include it if you expect to have
problems with the nose falling off on the
launcher.) Then, using the soldering
iron, cut an inverted 'U' (as shown
in the picture on the left) thus
creating a tab. The position of this tab
should be such that the nose cone can
rest on the tab without having to be
forced into position - in other words,
the tab stops the nose from sliding back
over the rocket during thrust phase and
allows it to fall off at apogee.
Then, slide the tip of the soldering
iron across the base of the tab lightly
so as to soften the plastic at this point
(don't heat it up enough to cut or
melt the plastic) and then, while
flexible, bend out to around 30° from
the side (as shown in the diagram).
Allow it to cool in this position.
Repeat at equal intrvals so that you end
up with either 3 or 4 tabs making sure
that they are positioned acurately so
that the nose cone is both supported
evenly and is straight. If you put too
many tabs on, you run the risk of
increasing the pressure inside the nose
cone.
|
 |
|
|
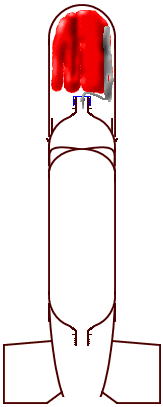
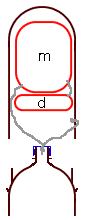
You now have the base unit for the nose cone.
Slide the base unit over the end of the bottle
and then tape it to the bottle, making sure that
the nose cone will sit straight on it.
Then, make a hole in the bottle top with the
soldering iron so that the elastic shock cord of
the parachute will go through it. Note that this
hole should only be large enough to take the cord
that you are going to use for the drogue chute -
during flight, this is a high pressure area and
if the hole is too large, it will allow air into
the nose cone which will cause early deployment.
Once you have packed your parachute, the job is
complete (see the photogaph at the bottom of
the page).
A circular parachute should be packed by
holding it by the centre in one hand whilst
holding the ring where the cords join either in
the other hand or under your foot. Make sure that
there are no tangles in the cords and then make
sure that the shroud has all of the loops of
farbic away from the axis (where the cords
should be). Now, gather up the shroud and
fold it into a three or four part zig-zag such
that the edge of the chute (where all of the
joints with cords are) protrudes a little.
The cords should be zig-zagged in the same way.
This means that the parachute occupies a minimum
volume and when the chute is deployed, there are
no tangles. If you were to scrunch the chute up,
there would be a distinct lack of space and if
you wound the cords around and around the folded
chute, it would never unwrap itself in time.
Using a zig-zag strategy means that the chute
acts like a spring when it is deployed.
Just add fins (see the aerodynamic
fins page for construction
details) and you have your rocket.
|
| Now all you
have to do is tie all of the bits
together in some sort of logical order
and fold and pack the cute correctly to
make sure that the parachute deploys at
the right time. Note
that by having a separate nose cone that
is secured to the base unit only by one
bottle top, it is possible to back the
parachutes into the nose cone, fill the
rocket and mount it on the launcher and
then take the nose cone, gently screw the
top onto the thread on the base unit (you
don't need to do this tightly as: it is
not going to get a chance to unscrew;
and, it only has to hold onto a hundred
grammes or so of rocket for a few seconds)
and put the nose cone in place.
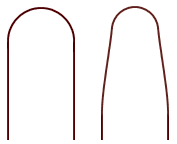
Here are some different strategies:
|
 |
As in the diagram
on the left, melt a hole in the
end of the nose cone and push the
drogue shock cord through it and
tie a knot to secure it. Pack the
main chute as described above,
then pack the drogue ensuring
that the drogue's chute will
deploy before the drogues strings
(this means that the drogue
will come out quicker). When
the nose cone separates, the
drogue deploys, pulling the nose
cone off the main chute and they
both float to the ground
separately.
As in the next
diagram, the drogue is tied to
the centre of the main chute
which is then secured to the nose
base unit using the bottle cap.
The nose cone itself is secured
via a short cord which is passed
through two holes melted in the
side of the nose cone (for
the sake of clarity, the diagram
shows this cord on the other side
- in reality it would be on the
same side as the main chute shock
cord) with a soldering iron
(make sure that you remove
any burrs with a sharp knife and
sand any rough bits). When
the nose cone separates, the
drogue deploys and drags the main
chute out of the nose cone and
they both float to the ground
together.
Another option is
to tie the drogue to the nose
cone (as in the first diagram)
and the main chute to the rocket
but to have a line that connects
the nose cone to one of the main
chute cords via a loose knot that
can slide up or down the main
chute cord. This line has to be
longer than the radius of the
main chute. When the nose cone
separates, the drogue deploys and
pulls the nose cone off the main
chute which then deploys. The two
float to the ground joined by the
line. The ony disadvantage this
has is that there is a greater
probability of the line snagging
the other chutes. An amount of
practice is needed to get the
packing right if you are going to
use this in a right first time
situation such as a science
olympiad.
|
 |
|
 |
One distict
improvement for this method is to allow
for the easy deployment of the main
chute. One serious problem is the
chute catching on any burrs on the nose
cone - simply cut off and sand any burrs
so that the chute will fall out freely.
Another serious problem is the amount
of force required to get the main chute
out. The easy solution is to sprinkle
talcum powder over the chutes and cords
and inside the nose cone - the talcum
powder acts as a dry lubricant.
One alternative
is to use a PTFE sheet inside the nose
cone. The sheet is cut so that it lines
the side of the nose cone (there is
no need to cover the end) so that
whereever the parachute needs to slide
across the inside of the nose cone, it
only comes into contact with the sheet.
These sheets are available in
supermarkets and are allegedly for lining
oven trays but their primary purpose of
making parachutes deploy easily is enough
to justify their existence.
An additional solution is to make the
nose tapered slightly - this has the
effect of making the sides of the nose
cone face the open end instead of the
other side. As a result of this and the
chute's own springiness, the chute is
pushed out to some extent.
To make the nose tapered, shrink it
slightly during the nose rounding stage (as
described on Body section of the 1½
litre 'Egglofter'
page).
|
 |
 |
|
 So, to use this
device: So, to use this
device:
- Pack the chute(s) (according to your strategy) in
the nose cone USING PLENTY OF TALC or a PTFE
sheet and put it to one side;
- Fill the rocket with water and mount it on the
launcher;
- Lightly screw the chute shock cord bottle top
onto the nose base unit (there is no need to
make it tight);
- Pressurise; and,
- Release.
Note that the order of steps 1 and 2 can be reversed
without consequence.
For Talc assisted deployment, look at pictures with the
circular Bin-Liner
and Nylon
parachutes.
For PTFE assisted deployment, look at
some pictures of a 2
litre rocket.
 Back to
the Water Rocket Recovery Systems Index Back to
the Water Rocket Recovery Systems Index
Back to the Water Rocket Index
|
|