If you have never seen one of these things fly, and perhaps doubt that they can, this is the one to start with. This page will tell you how to put together a neat little rocket, make a connector that you can then use as a nozzle and then launch it using a bicycle pump to gauge the pressure. This baby is simple to construct, small enough to handle reasonably safely but demonstrate the basics of water rockets. I recommend that you read it right through first so that you can see what you would like to experiment with.
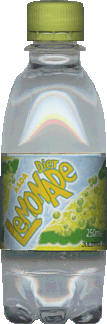
Rocket The body of the rocket is a simple 250 ml pop plastic bottle (a 330 ml bottle will do if you can't find a 250 the idea is that the amount of energy it can hold is small - ish). These bottles are capable of taking pressures in excess of 100 psig so are reasonably safe (I can't stop you from blowing one up if you really want to though). For the purposes of your first launch, there is nothing more to it than that. As a precaution, you should make sure that the bottle has no cuts or deep scratches in it, no excessive folding in it (it will get quite battered once you have done a few dozen launches with it but this type of damage is usually all right) and is washed out (it is better to make sure that only clean water goes into the rocket as the acids in fizzy drinks may attack the metal components of the pump should you get propellant flowing back for some reason - you do want to carry one using it as a bicycle pump as well). Connector See the connector
page A sharp kitchen knife (such as a vegetable peeler) or a penknife may be used and will cut a good enough hole as will using a sharp drill (remember that the bottle top is soft) and finishing off the hole using a taper-reamer. It may take a few tries at this - I found that a sharp knife was good at slicing through towards one side. Make a ring of Blu-Tack (or one of those plumbing sealant compounds - you need less than a gramme) and put it around the hole on the inside of the top and then screw the adaptor (right) into the hole in the top (as per the diagram above) so that the Blu-Tack (or whatever you used) forms a seal. If you used a flexible sealing compound that sets, now is the time to let it set but first, you need to make sure that the bottle can screw onto the cap and still leave a gap between it and the sealant. You will probably find that a finger and thumb don't provide a good enough grip on the adaptor to tap the hole the first time that you screw it in. You can solve this either; by tapping the hole from the outside (where you will have a good enough grip), unscrewing the adaptor and then screwing it in again from the inside; or, by using a pair of pliers. Whatever you do, make sure that the adaptor goes in as straight as it can. Any deviation from axial will make the rocket fly in a loop. If the top has a separate seal, cut a hole in that so that it will fit into the cap. First Launch You now have a bottle, We already know the following . . .
We can work out the drag factor by taking the bottle to a suitable height, timing its fall (please make sure that it doesn't do any damage when you do this - a first floor window of around 3.5m will do, not from a tower block - I can't be held responsible for damage that you do) and then putting the initial height and the other parameters that we know into the computer model with a suitably low weight of propellant and adjusting the drag factor in the model so that the time it take to fall is the same on the model and the real thing. This process of calibrating a computer model is more important than simply looking up figures that someone else has provided and simply putting them into the computer model without first having checked them. A computer model is worse than useless if it is not calibrated. Hey's law: Garbage in, garbage out. With the drag factor in place and launching from a hand held 0.5m (cautious crouch), the computer model predicts that for a pressure of 4 BarG, the maximum height attained will be 17.4m with a weight of 135g of water with a flight duration of 4.2s and for 6 BarG, the maximum height attained will be 21.9m with a weight of 150g of water with a flight duration of 4.7s. With the accuracy of a bicycle pump, we will take the average of these. Weigh in the water (somewhere between the two figures will do), mark the side of the bottle with a permenant marker, and trot off to your launching ground (remembering to take a couple of litres of water with you and a set of fins if you want - see below) which should be well away from cars, people, buildings and so on.
Improvements Fins One of the easiest improvements is to attach fins. These have many effects which include making the damn thing fly straight(er) and moving the centre of drag downwards thus improving the stability slightly that way. Unfortunately they also increase the weight and the overall drag. In addition to this, they allow you to make the rocket rotate slightly during flight.
First, cut off the neck of the bottle so that the resulting hole will only just fit over the screw thread of the rocket bottle - ideally it should be so tight that you hace to screw it on - the acceleration ivolved means that anything that you use to attach anything a rocket will have to support many times the weight of whatever it is that you are putting on. Cut off the bottom of the bottle so that you have 100mm - 200mm of bottle left (make it longer for a larger bottle).
Then, fold along each of these flaps so that they form a V in cross-section and look more like fins. As it is impossible to get the nozzle in
perfectly straight If there is not enough spin, the rocket will loop - too much spin and the rocket will form a vortex inside which will let the air out before all of the propellant is used up. You will also have to recalibrate the drag on the computer model if you are going to use it to predict the height of a flight although, by not altering the nozzle or the pressure, the optimum mass of propellant should not be significantly different. Nose Shape
There are a number of ways that you can alter the shape of the nose of a rocket, either by: adding bits; or, moulding the end. If you do heat up the end and blow it into whatever shape you want, you must pressure test it afterwards. There are a number of web sites that deal with moulding noses on the index Launchers How to avoid getting soaked. There are a number of web sites that deal with lauchers on the index. Any successful launcher must use materials and processes that are available world-wide.
|
|||||||||||||
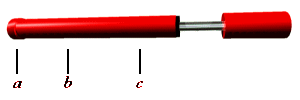 Invert the bottle (the
water has a higher viscosity than air and so if
there are any slight leaks - leaks being
particularly important on small rockets - the
water will tend to slow down the process)
and pump air into the bottle until you judge it
to be at the correct pressure. You an judge the
pressure to some extent by looking at whereabouts
in the pump stroke, the one-way valce opens and
starts letting air into the rocket. In the
diagram above, a is the end of the pump (not
the end of travel of the piston), b is where
the one-way valve starts passing (for the
purposes of this experiment, we can assume that
this position tells us when the pressure inside
the pump equals the pressure inside the bottle -
ignoring losses and adiabatic compression et
cetera) and c is where you start the pump
stroke. The pressure in BarG will aproximate to
(a-c)/(a-b)-1. If you want to pump as much as you
can by hand, having the air bubble through water
will show you when you have reached the limit;
Invert the bottle (the
water has a higher viscosity than air and so if
there are any slight leaks - leaks being
particularly important on small rockets - the
water will tend to slow down the process)
and pump air into the bottle until you judge it
to be at the correct pressure. You an judge the
pressure to some extent by looking at whereabouts
in the pump stroke, the one-way valce opens and
starts letting air into the rocket. In the
diagram above, a is the end of the pump (not
the end of travel of the piston), b is where
the one-way valve starts passing (for the
purposes of this experiment, we can assume that
this position tells us when the pressure inside
the pump equals the pressure inside the bottle -
ignoring losses and adiabatic compression et
cetera) and c is where you start the pump
stroke. The pressure in BarG will aproximate to
(a-c)/(a-b)-1. If you want to pump as much as you
can by hand, having the air bubble through water
will show you when you have reached the limit;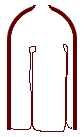 These fins are made
from a 1.5 litre or 2 litre bottle that you will have to
butcher (I mean form) into the correct shape.
They are not the prettiest of fins or even the best but
they are easy to make, will survive numerous launches and
landings and you don't need any skills, materials or
machinery that you haven't already got.
These fins are made
from a 1.5 litre or 2 litre bottle that you will have to
butcher (I mean form) into the correct shape.
They are not the prettiest of fins or even the best but
they are easy to make, will survive numerous launches and
landings and you don't need any skills, materials or
machinery that you haven't already got.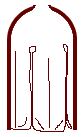 Use a hot soldering
iron (or hot nail in a pair of pliers) to melt
four to six holes through the side of the bottle, evenly
spaced, approxiately where the sides straightne out from
the neck. Cut from these holes, down the bottle to the
bottom of the bottle to for equaly sized flaps.
Use a hot soldering
iron (or hot nail in a pair of pliers) to melt
four to six holes through the side of the bottle, evenly
spaced, approxiately where the sides straightne out from
the neck. Cut from these holes, down the bottle to the
bottom of the bottle to for equaly sized flaps.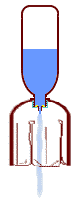 (it
certainly won't be if the rocket lands on it), you
can make the rocket rotate during the flight by turning
the corners alternately in and out (as in the diagram
on the left) so that it will spiral during the
flight therefore cancelling out the effects of all but
the most ill-aligned nozzles.
(it
certainly won't be if the rocket lands on it), you
can make the rocket rotate during the flight by turning
the corners alternately in and out (as in the diagram
on the left) so that it will spiral during the
flight therefore cancelling out the effects of all but
the most ill-aligned nozzles.  Nose shape will alter
the amount of drag and the position of the centre of
drag. Clearly, the bottom of a pop bottle does not
possess the best coefficient of drag in the Universe and
studies have been carried out on various shapes. Shape 1
on the left (elliptical) is the best shape for
subsonic flight although shape 2 (best for supersonic
flight) is sometimes easier to construct. Shape 3 (included
here for completeness) is for hypersonic flight. The
height to width ratios also vary.
Nose shape will alter
the amount of drag and the position of the centre of
drag. Clearly, the bottom of a pop bottle does not
possess the best coefficient of drag in the Universe and
studies have been carried out on various shapes. Shape 1
on the left (elliptical) is the best shape for
subsonic flight although shape 2 (best for supersonic
flight) is sometimes easier to construct. Shape 3 (included
here for completeness) is for hypersonic flight. The
height to width ratios also vary.