Click Here to go to the MkI aerial stills camera Aerial Video Camera. With the appearance on the market of a small, affordable camera that is capable of taking short video clips that can be downloaded onto a PC, I thought that this would be too good to miss.
The Camera This is Digital Dream's "l'esprit" camera
which has a certain amount of functionality in addition
to an attractivly low cost (~£40.00 - GBP). This camera
will take 20 shots in CIF resolution or 80 shots in QCIF.
CIF, or Common Intermediate Format, is 288 non-interlaced
luminance lines, that contain 352 It will also take continuous video at around 12fps in 24bit colour in either resolution until all of the frames are used up. You can switch modes (between CIF and QCIF) mid-run and therefore, if you have started off in QCIF and find something that you wish to take in high res, you can swap over without losing any of the already taken frames. Also, taking a high-res shot after a number of low-res shots that is not a multiple of four will not lead to wasted memory as pictures appear to be stored end to end and not in blocks. The l'esprit camera is, in effect, a webcam with: onboard power supply; around 6Mb of memory; mode selector button; "shutter release"; status display window; and, USB interface (using a particularly small plug - see photographs above and below). It will also allow you to use its self-timer giving 10 seconds delay before taking a single shot and will work well in high to low light levels, correcting colour balance automatically for each source type (the disadvantage of this is the familiar magenta cat on a grey lawn syndrome but colour correction on image processing software takes care of this). The camera takes 4 x AAA bateries, measures nearly 9cm wide, is almost 3cm thick and weighs around 110 grammes with the batteries. There is a smaller version of this camera - "l'espion", with essentially the same specifications except that it is smaller, uses smaller batteries and therefore weighs less but this is just right for my needs. The software that came with it (on CD ROM for PC) has a TWAIN interface with it but if you download the latest interface from the company's website, you get a nifty AVI creator program that will generate an AVI from the first frame until it either gets to the end or until the format changes (the disadvantage of this is that if you take some video after a few other shots or change format, you run into trouble but you can download the images as many times as you like into as many programs as you like without losning any of them. There are also many programs on the Internet that will allow you to edit AVI files and others that will let you process them to compress them such as the Real Media program I use for this website).
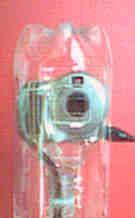
The shutter release switch (for want of a better term) requires a certain amount of force to throw it but less force to keep it down. This means that if I put a rubber band or two over it, I can make it such that it will stay open until I press it and then it will stay closed (until all the video memory is used up). With this in mind and the fact that 6.5 seconds is enough to get the ascent stage of a flight in, I decided to make a holder for the camera and have a hole in it for me to press the button (with enough space for me to lift it again afterwards). In the picture on the right, you can see that there is a rubber band wound twice around the shutter release giving me enough tension to hold it down once triggered. Mounting The Camera
I then put the camera in it and while holding it in place, used the creme brulee torch with a small (1cm) flame to shrink the bottle around it, taking my time over it so that: the shrinkage was fairly uniform; the camera could be taken out; and, most importantly, so that I didn't cook the camera. Once I had finished, I used a felt tip pen to mark out the place on it where the USB socket was and used the soldering iron to cut a hole sufficiently large for the plug to fit. I also cut some tabs so that an elastic band could be used for securing the camera and so that they wouldn't slip - these are at the bottom, near to the neck. With an elastic band now securing it and the camera plugged into the computer, showing a live picture, I marked out the position on the plastic where the edge of the image was and then took out the camera and cut this out with the soldering iron. I also cut out holes for my finger to get to the mode button and the shutter release. Once I had done this, I butt-welded the bottle onto the top of another bottle that would fit onto the top of a rocket pressure vessel. I did this by holding the two together and melting the PET plastic where they joined for around 2mm either side and moving the iron in a zig-zag pattern to mix the plastic. Once I had finished, this was quite strong. I then used the bottom section of that bottle to go over the top of the adaptor - marking the orientation with a few melt dots on the surface where they meet - and marked off where the USB plug went. With that cut out, I plugged the camera into the computer again and marked out a window for the camera - giving a few milimetres extra for alignment in the field. With the other holes made (so now we have one for the USB, one for the camera to see the world, one for the mode switch and one for the shutter release) it is possible to secure the camera inside with the release tensioned, tape the thing together and but a pressure vessel below and parachute above, take it into the field, launch it and recover the footage without taking it apart. Use Preparation
In the Field
To the pictures taken with the video camera . . . |
|||||
|
 Materials and equipment
 pixels, or 352 x 288. QCIF or Quarter CIF,
is 176 x 144. The ITU-T's videoconferencing standards
refer to a number of frame rates but they are not
relevent here.
pixels, or 352 x 288. QCIF or Quarter CIF,
is 176 x 144. The ITU-T's videoconferencing standards
refer to a number of frame rates but they are not
relevent here. 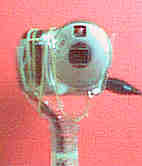 The Release
 The camera is a
little bit smaller than the width of a UK 2 litre pop
bottle so I started off by taking one bottle, removing
the label and dryiing it out. I then screwed the top on
and heated the neck end of it gently above the gas ring
(use a barbeque or try and electric cooker), rotating it
for around 10 minutes while it shrunk down, losing around
1cm off the diameter. I then let it cool down and cut the
bottom off this bottle, leaving around 10cm or so from
the neck.
The camera is a
little bit smaller than the width of a UK 2 litre pop
bottle so I started off by taking one bottle, removing
the label and dryiing it out. I then screwed the top on
and heated the neck end of it gently above the gas ring
(use a barbeque or try and electric cooker), rotating it
for around 10 minutes while it shrunk down, losing around
1cm off the diameter. I then let it cool down and cut the
bottom off this bottle, leaving around 10cm or so from
the neck.