Water Rockets - Science Olympiad
The
Challenge
Science
Olympiads provide an interesting set of
constraints within which to work. Many of the
rules are concerned directly with safety and
rightly so, others make the competition
fairer.
The
object of the excercise is usually to keep a
'simple' water rocket in the air for as long
as possible.
This
page is not intended as a cheat, it simply
discusses the issues and ways of working
within the applicable rules - the applicant
still has to use his or her skills to build
one.
Rules that
apply to rocket construction
The following are parts of the rules that
apply to the construction of the rocket. They are
not the rules in their entirity and when two
appear in one section, they appear here as
separate. [My comments are
in blue.]
| 1. |
No
commercially finished or model products may be
used. |
| [So no
ready-made nose cones, fins et cetera.] |
| 2. |
The
pressurized portion of the rocket must consist of
one plastic 2 liter pop bottle. |
| [No
joining two together.] |
| 3. |
The
manufactured structural integrity of the bottle
cannot be altered. |
| [Apart
from the safety aspect, no drilling of holes (for
timers an so on) or modifying the shape of
the nose or nozzle inlet (as has been done
with the 1½litre 'Egglofter').] |
| 4. |
No
metal parts will be allowed on the pressurized
rocket body. |
| [This
really means no metal fins or nose cones for
obvious safety reasons - in past years it has
referred to any metal on any part of the rocket
which excluded clockwork timers. We shall stick
to the 'no metal at all' meaning just to make it
interesting.] |
| 5. |
The
mass of the empty rocket assembly cannot exceed
250 grams. |
| [Safety.
We don't want to do too much damage on impact.] |
| 6. |
All
energy imparted to the rocket must originate from
the water/air pressure combination provided by
the judges. No other potential or kinetic source
of energy will be permitted. |
| [If you
are going to use elastic bands, they have to be
slack at the beginning - the beginning is the
time of launch, not the time it
is mounted on the launcher - any stretching has
to be done after lift-off. This also disallows
balloons as parachute release mechanisms as the
pressure inside the balloon is not derived from
the 'water/air
pressure combination provided by the judges' - the only way that it could be
would violate the third point.] |
| 7. |
Timing
of the rocket stops when the first part of the
rocket hits the ground, or when the rocket
disappears from the judge's sight, or when the
rocket impacts or gets entangled with an object
(e.g. the rocket collides with a tree). |
| [It has to
stay up for as long as possible and if it is to
remain in the sight of the judges, it should go
straight up.] |
| 8. |
All
rockets will be launched at a pressure not to
exceed 60 pounds per square inch. |
| [A
physical limitation with safety in mind in
addition to making the competition fairer.
Note that this pressure may be lower in some
competitions] |
| 9. |
.
. . but only one launch is allowed per rocket.
|
| [It has to
work first time.] |
| 10. |
Though
various rocket components may separate during the
flight, all must remain linked together with a
maximum distance not to exceed 3 meters. If a
nose cone is used, it can separate, but should
remain attached to the rocket body. |
| [The nose
cone has to be tied to the rest of the rocket
thus limiting parachute cord length but this is
not unreasnable.] |
| 11. |
All
rockets will be launched using the launching pad
provided by the supervisor. |
| [A fair
standardisation. This does mean that before
constructing a skirt for fins, confirmation of
dimensions of the launcher should be sought.] |
| 12. |
No
materials will be allowed that can compromise the
integrity of the plastic bottles (e.g. hot glues
or super glues). Sanding or other abrasion of the
plastic used for the pressurized body of the
rocket is not allowable. |
| [Play safe
and keep to tape.] |
The actual wording may vary (though it
will always be written in stone) but whether
it does or not, the principle is an interesting
one.
Discussion
Effectively, everyone starts off with a
standard 2 litre bottle and has to fasten bits to
it.
As blowing out the front of the bottle to make
a hemispherical nose is not allowed, some sort of
nose cone should be used. As the idea is to keep
a bottle aloft for as long as possible, a nose
containing a parachute seems like a pretty good
idea.
Adding fins will keep the rocket
aerodynamically stable and allow it to get higher
and therefore fly longer. Fins should be mounted
on a skirt in order to keep the weight down (pushing
the centre of drag backwards without adding too
much weight) - using fins that are mounted
on an aerodynamic skirt will allow for less drag
and a higher flight still.
However, some Science Olympiad launchers do
not allow for anything protruding further back
than an imaginary plane level with the flange. An
example of this can be seen on Patrick Matthews'
site at http://home.att.net/~pat.mat/rockets/bluemonster.htm
which illustrates the point quite well. If your
rocket design is intended to travel up the path
of success through various competitions, you may
encounter such a launcher in which case, you
should mount the fins on the side of the 2 litre
bottle - details later on.
Nose
| The nose that I have
chosen is the 'nose
separates at apogee' nose
cone which has its own page - the tapered
nose cone should be the better type. With
this design, the nose cone may be packed
before mounting on the rocket and stored
separately. This means that the chances
of the nose falling off when mounting the
rocket on the launcher are liminated.
With a permenantly fixed chute, if the
nose does fall off, it can take a few
minutes to repack it properly. People
usually get around this by taping the
nose cone to the rocket body - and then
forgetting about it only to see their
pride and joy hit the Earth at around 50
mph with the parachute still inside the
nose.
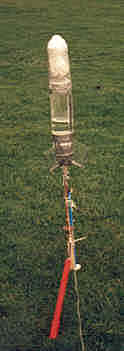
Pictured right is the actual rocket (with
plenty of talc) mounted on the Copper
Tube Launcher.
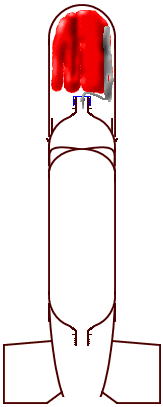
Far right is the diagram for how to
fit the bits together. You should have no
trouble with aerodynamic stability (see
the stability section on the 1½
litre 'Egglofter'
page for an explanation) with this
design so you should not need at add any
weight to the nose.
|
 |
 |
 Parachute Parachute
The parachute should be as light as possible
and, taking into account the fact that you may be
allowed to have two launches and therefore need
to have two parachutes (keeping the cost down),
the Bin-Liner
parachute is the best choice for the
job.
This chute opens well and weighs very little.
A further weight reduction can be made by using
thinner cords although these will tend to pull
out easier.
For a Science Olympiad, the drogue or nose
cone needs to be joined to the rest of the rocket
- see the 'nose
separates at apogee' page for more
details on various strategies and how to fold a
parachute. Practice makes perfect.
Fins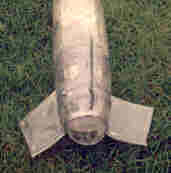
The fins should be mounted on a tapered skirt
and just such a device is detailed on the fins
page.
If you want to keep weight low, you may like
to try and find a lighter tape or maybe use a
glue that is available locally and allowed in the
rules.
If you are likely to encounter a launcher such
as those shown on Patrick Matthews' page http://home.att.net/~pat.mat/rockets/bluemonster.htm
you should design your fins so that they do not
protrude beyond an imaginary plane level with the
flange (this can still be on a skirt although
a fairly short one). Attaching them to the
side of the rocket and using a swept back
parallelogram shape, such that the edge stuck to
the rocket is on the straight sides but the
distal edge (the edge furthest away from the
rocket) goes back as far as the launcher
will take (ie, level with the flange).
Doing this will allow the centre of drag to be as
far back as possible.
Assembly
Once you have built the bits, you should take
care to mount the nose cone base and the fins
unit centrally as this will make it fly better.
Weigh the rocket with the parachutes and
calculate the best amount of water for 60 psi (or
whatever is specified in your particular set of
rules). Add that amount of water and mark on the
side of the rocket where the level is (both
upside down and right way up - making sure that
you can tell which is which)
Decide on your chute packing strategy and you
are ready to go.
Launching
- Pack the chutes in the nose cone and put
it somewhere safe and dry.
- Overfill the rocket slightly and mount it
on the lanucher.
- Add a little air and Bleed off any excess
water down to the mark.
- Take the nose cone and screw the shock
cord bottle top onto the nose cone base.
- Carefully position the nose cone.
- Pressurise to 60 psi (or whatever)
- Release.
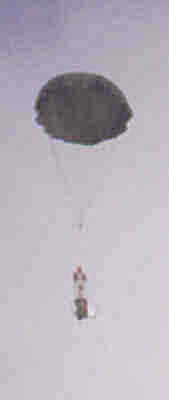
If you have packed your chutes okay it should
deploy the chute soon after reaching apogee and
float safely to Earth.
Thanks to
Patrick Matthews for providing a set of the rules
and for taking and displaying the photographs of
the launcher on his site (a healthy appreciation
of the circumstances of the launch[er] will never
go amiss).
Look
at the pictures . . .
 Back to the Real Rockets Index Back to the Real Rockets Index
Back to the Water Rocket Index
|