 |
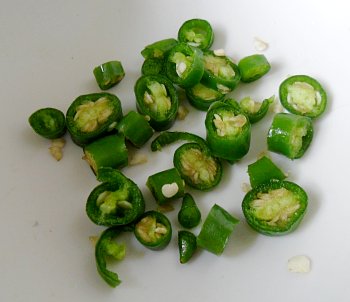
The first step is make everything
small so chop up the chillies. |
A lot of the first step is in the preparation because we are using anise seed which has volatile oils in it and boiling water which will tend to strip them out if they are in there too long.
So, the only real preparation is to make the chillies fine enough - this takes a little bit of time but it is more than you have when you add the water to the other ingredients.
First, chop up the chillies.
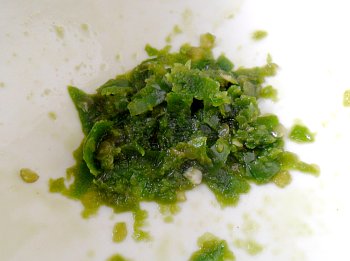 |
Now, grind them with the pestle.
. |
Next, use the pestle to grind them up.
You won't be able to make it a fine slurry but you just need to make sure that there are no full-thickness pieces in there.
Once it is ground up to your satisfaction, put it on a teaspoon - this will make things quicker in the next step.
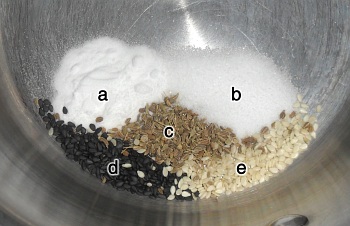 |
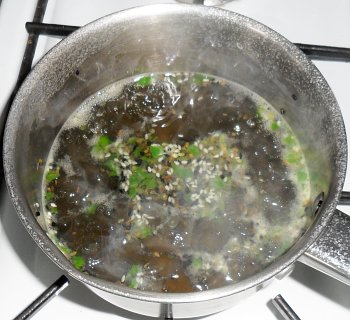
a) Sodium Bicarbonate, b) salt, c) anise seeds,
d) black sesame seeds e) white sesame seeds. |
In a milkpan, put the sodium bicarbonate, salt, anise seeds and black and white sesame seeds.
Don't put the chilli in.
Add the boiling water and put on a low heat and bring to the boil again.
Boil until the salt and the sodium bicarbonate have dissolved.
Before you add the chilli, remember that if you put chillies into boiling water for too long in an enclosed space, you will gas everybody. See the knowledge section about chillies in knowledge and cheats.
 |
Boil to make this green,
alkaline, anise-flavoured tea. |
So, we have our boiling anise tea.
Make sure you have your rice flour in a mixing bowl, ready.
Add the ground chillies and stir it in.
Give it a short while to cook - refer to the above as to why not too long.
 |
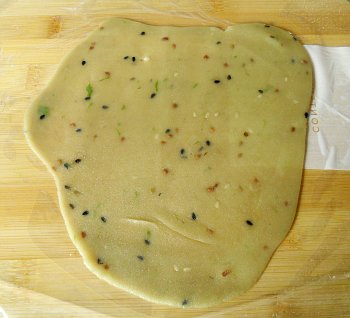
Chilli water added to the flour.
This isn't particularly hot either. |
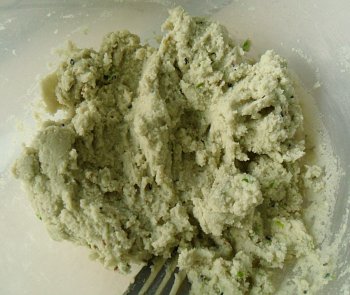
Add boiling the chilli/anise water to flour and stir it in.
This will form a thick paste.
Stir it with a fork until it is all mixed in.
Next, we need to cook it properly so that the rice particles can cook with the water we have just added - the paste we have at the moment has not been hot enough for long enough for it to have cooked properly which is why it is an opaque paste.
You now have a choice - steam it or microwave it:
Steam it:
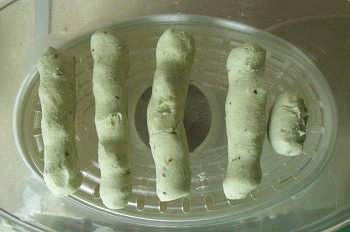 |
Chilli rice sausages
- before cooking. |
Put some oil on your hands and break a bit off - around a quarter of this recipe - and form it into shapes that are thin - around 2cm thick - but with a low surface area.
This is so that any arbitrary part of it is close to the surface and therefore quick to cook but by choosing a shape with a low surface area, we are reducing the risk of leaching from the surface during the next stage in cooking.
Spheres, toruses and here, straightened out toruses.
These are around 2cm in diameter and as long as it takes to get them in the steamer.
 |
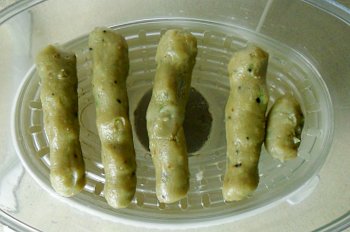
During cooking, they turn darker as
the surface becomes translucent. |
Set the steamer to run for a maximum of half an hour.
Once it has got hot, you will notice that the surface of the dough darkens and becomes more colourful - this is as the particles of rice flour hydrolyse and start to mix with each other.
If you continue cooking, the dough sticks will start to foam as the carbon dioxide from the sodium bicarbonate starts to come out - you don't want that so if it happens, the dough is ready and you can proceed with the next step.
If that doesn't appear to happen then after, say 20 minutes, get a knife and take the top off the steamer. Push the knife into one of the cylinders and if it looks cooked, then it is ready.
 |
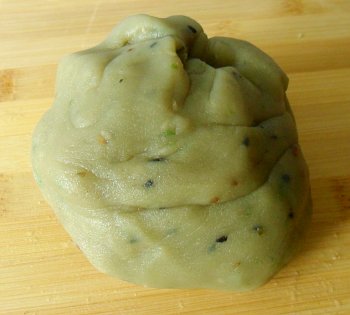
After cooking
- ready to knead. |
This is what they look like once they are cooked.
Take them out, one at a time and kneed them - this makes the hydrolysed blobs of starch start to mix in with each other.
This has the effect of making the dough ductile - hence the name 'khichiya' which means 'ductile'.
As you finish kneading them, put them together to form a ball
You can put this back in the switched-off steamer to stop it from cooling down or drying out too much whilst you perform the next step.
Microwave it:
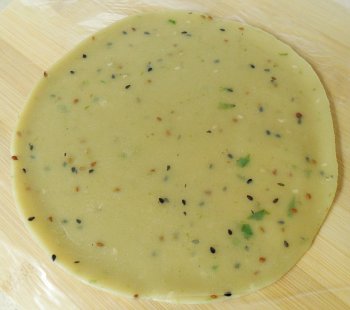
Roll the rice-flour paste into a ball and put it in the middle of a large (20cm wide), sealable freezer bag. but don't seal it yet.
Use a chopping board to press it into a flat sheet, around 1-2cm thick. press most of the air out of it - it doesn't have to be all of it - and seal it.
Put it onto the rotating table of your microwave and, for an 850Watt microwave, cook it for 2 minutes.
Take it out and turn it over - you might notice that there are circles of the slab of dough that are more cooked/transparent than others. This is where the distribution of microwave energy in your oven is not even and why you should only use a microwave with a rotating platter - if the food just sits still in there, it will over cook in places and not at all in others.
Put the microwave on for another 2 minutes and watch it.
If the bag starts to inflate then the carbon dioxide is probably starting to be released or it is steam - in either case, you need to switch the oven off and take out the dough slab.
Now, cut the bag from top to bottom and then, using the bag - the dough is hot - fold it over so that the slab is double thickness and then squash it.
Repeat this several times, folding the outside edge into the middle so that you are kneading it and mixing any slightly undercooked areas in with any slightly overcooked areas.
Finally, roll it into a ball.
Before the steaming, the dough was malleable - it was plastically deformable under compression but not tension.
Now, it is ductile as well - 'ductile' meaning that it is plastically deformable under tension - so we can use tension as well as compression to form it.
Having performed that transition and even named the food product after that physical property, we are going to form its final shape using compression and not tension. Ho hum.
Then...
 |
All in one lump, kneaded
and ready for the next step. |
You need to keep the dough at around 40-60C to work it so don't let it cool down.
 |
A small piece, enough to
form a 2cm diameter ball. |
Place a sheet of fairly thick plastic on a chopping board.
I used a freezer bag, sliced down the sides to make one long sheet, putting one side on the chopping board.
Take a small ball - enough to form a ball of around 2cm in diameter.
Put it in the middle of the chopping board and put the other side of the freezer bag over it so that it now sits between two sheets and can expand equally in all directions.
You now have another choice - roll it or press it:
You can do one of two things: roll it; or, press it.
 |
Rolled with
a rolling pin. |
Roll it:- use a rolling pin to press the dough out into a circle/lunch-box shaped piece.
This has the advantage of it being easy to get thin papads - you can hear the seeds as the rolling pin runs over them.
It has the disadvantage that it is difficult to make them uniformly thin - they tend to have thin lines in them and when you lift them off this surface, they can tear there; or,
 |
Pressed with a saucepan bottom and
a lot of weight (around 40kg or so). |
Press it - 1 Flat and heavy:- Press the ball into a circle by putting something flat and heavy - or something that you can exert a lot of force on - on top of it such as a large pot.
This has the advantage that it is extremely easy to get a circular papad.
It has the disadvantage that it is difficult to apply enough force to spread it any further once it has got to a certain size.
I put around 40-60kg force on this and managed to make a papad of around 15cm diameter.
Press it - 2 Improvise:- As an alternative to this, I managed to find an old potted meat press - it is made from cast iron and has a square-threaded screw with a big handle on the top - and used that.
The pressure plate is around 5" in diameter and with a small chopping board and a copy of The Writers' and Artists' Yearbook under it to give it the required thickness, it makes great papads (remembering to use the plastic sheet of course), using a force of the magnitude that I could never get with my weight alone.
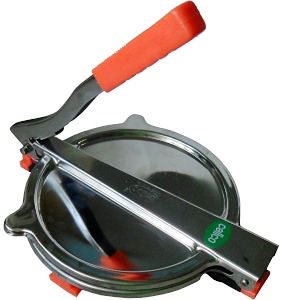 |
A puri press is designed specifically for doing
this and similar jobs. It is quick and easy. |
Press it - 3 Buy a Puri Press:- This is certainly not an essential but a puri press makes the job of producing large quantities of medium-sized, round, thin pieces of dough, very quick and very easy.
The plates are around 5" in diameter and it is extremely easy to use.
Again, using plastic sheet, just place a small ball of dough on the press, put the lid down and depress the handle.
The dough is quite viscous so it takes a bit of time to press it - getting it to flow between the plates.
This is around 10-20 seconds or so.
However, the papads produced by this method are far superior to those produced by the other methods in that:
- they are nearly perfectly round;
- they have flat surfaces; and,
- they are fairly uniformly thick.
Remember, the thinner they are, the quicker they will dry out and the better they will cook. You just need to find enough space to dry them out.
Then...
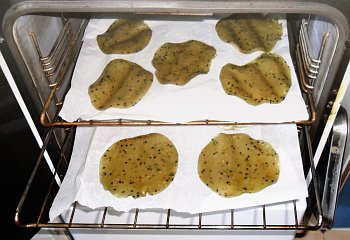 |
Here, you can see them in the lower
half of the oven as gas mark 'S'. |
Carefully peal away the plastic sheet from the top - it actually does it fairly easily - and place it on a cooling rack to dry out.
Once it is in place on the rack, peel away the other side of the plastic sheet - again, quite easily.
One thing to remember here is that they will stick to each other - there is no oil layer or dry powder to stop them from doing that.
Now let it dry out.
This can take:
- around 6 hours to do inside (at around 20C - not everybody lives in a sub-tropical paradise) with a fan blowing over them; or,
- only an hour or two in an oven at gas mark 'S' (which, using a thermocouple to measure it, is around 50C in the middle of the oven - remember that we are drying them out and not cooking them),
but it is worth doing it properly. Remember to turn them are regular intervals so that they will tend to dry flat.
If you are using the oven and putting them on baking paper as in the photograph, there comes a stage when they lose a lot of their stickiness. At that point, you can take them off the paper and place them directly on the bars.
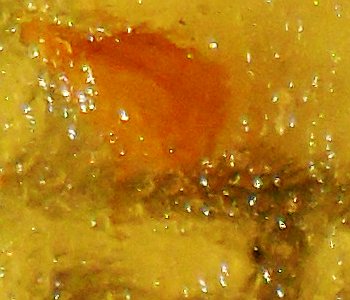 |
Once dried you can see the small,
starch gel blobs (and an anise seed). |
This will allow them to dry better because air can flow around both sides at the same time.
Without proper drying, when you cook the papads, there is still too much water in the rice dough and it goes all soft and soggy in the oil, making for a less than pleasurable eating experience.
Dry it out properly and it works well.
You can see from the photograph on the right that the starch gel is made up from thousands of tiny cooked starch grains. The large orange thing in the top left is an anise seed so that gives you an idea of how small these are (around 50-100 microns).
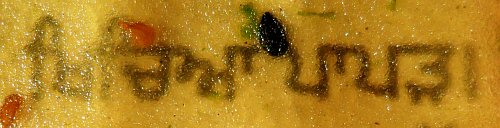
When it is dried out properly, you should be able to read through it - I find that around about 9 point text is legible.
In the image below, you can clearly read the text 'खिचिया पापड़' and the green thing is a piece of chilli.
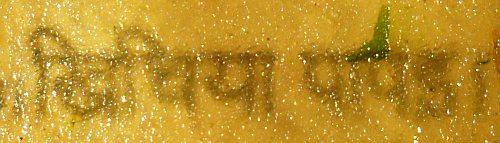 |
Khichiya Papad in 12 point Devanagari (the script used to write Hindi).
|
 |
In deep oil at 190C, it sits there
for a few seconds and then ... |
The dried papads can be stored for a year or more out of sunlight and in the cool and dry - I know someone who, in one day, makes a batch of 600 which lasts a year or so.
To cook them, you can use the microwave, naked flame, tava or deep oil.
Here, they are in deep oil at 190C.
The sit there for a few seconds ...
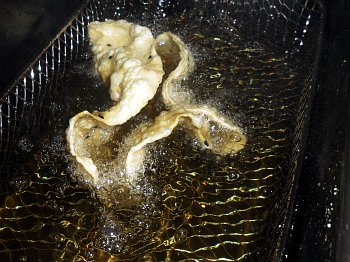 |
... springs to life, cooking
from the edges ... |
and then it springs to life, cooking from the edges first.
They rise up to the surface fairly quickly...
 |
... and then the middle. Hold
it under for a few seconds. |
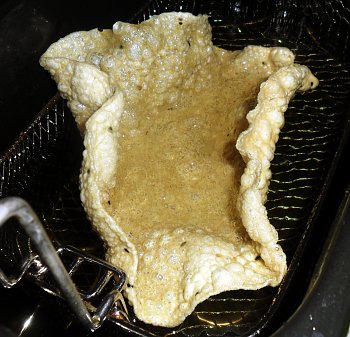
... and then the middle cooks.
You can turn it over to cook the edges if you think that they have been a bit undercooked as a result of the speed at which the thing rises to the surface.
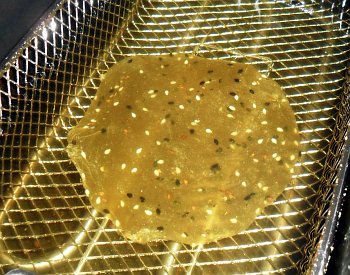
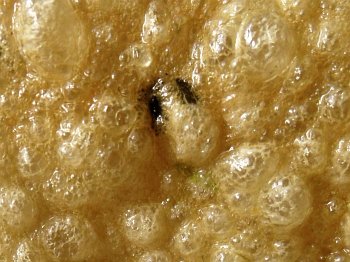 |
The surface has a fine,
bubble structure. |
Once they are cooked, drain them and put them on paper kitchen towel to soak up any excess oil.
Whilst they are fairly strong, they are also fairly friable.
Here, you can see the fine bubble structure with a couple of sesame seeds to give you an idea of the scale.