Filling:
a | 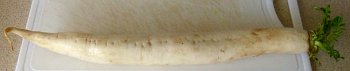 |
b |  |
c |  |
d |  |
e | 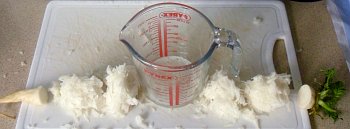 |
| | Mooli preparation - Top, tail, skin, grate and squeeze
(don't discard the juice - it's used later). |
Top and tail the chillies and cut into pieces around 5mm long.
Peel the onions and chop them finely. Skin and then grate the ginger.
Top and tail the Mooli and then skin it with a potato peeler.
Next, grate it and then squeeze most of the excess juice out of it, making sure that you collect it when you do so.
When squeezing out the juice, use a sieve to stop any bits of mooli from getting into the liquid because these will mess up the dough when you are rolling it out later on.
As an example, this particular mooli was just about 50cm long and weighed around 365g. The top and tail weighed 33g, the skin weighed 75g and I managed to squeeze 57mls of juice from it, leaving 200g of dry, shredded mooli.
We will supplement the water for making the dough with the juice, later on.
 |
Onions, chillies, spices, mooli
and besan, all cooked. |
In a deep pan, fry the jeera until it changes, then add the asafoetida and stir that until it has cooked (around 30 seconds or so).
Add the coriander powder and fry that.
Add the chopped green chillies and then the onion.
Fry it until the onion has gone soft and translucent.
Add the shredded mooli and the ginger and garlic and fry.
Add the chopped coriander leaf, besan and lemon juice and then fry that, stirring all of the time, until the 'beany' smell of the besan has gone.
You can add some water at this stage to make the filling more of a paste than loose ingredients - this is why we have added the besan.
You can, leave out the besan all together if you wish - it is yours to experiment with and find out what suits you best.
Switch the gas off and let it cool down.
One point to note is that the quantity of filling that you produce is rather dependent upon how big the mooli is and you can have a bit left over at the end of the process. You can use that excess to make quite tasty mooli pakoras.
Put the flour in a bowl and add all of the mooli juice.
Stirring it with a fork, gradually add cold water until you have quite a stiff dough - I added a total of 290 mls of water and mooli juice to this but that can vary according to the water content and particle size of the flour you use so you need to use your own judgement on this.
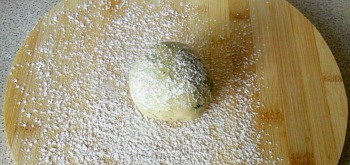
Once you have your stiff dough, roll it into a ball, put it back in the bowl, cover it with a clean, dry tea towel and leave it somewhere cool to rest for at least 20 minutes.
Divide the filling into six, equal parts.
 |
Once sixth of your dough,
rolled into a ball. |
While the dough is resting, make sure that the filling is the right consistency - it should be a similar stiffness to the dough so that it rolls out properly.
Now that it has rested, divide the dough into six equal parts.
Take one of them and roll it into a ball, sprinkling it with flour.
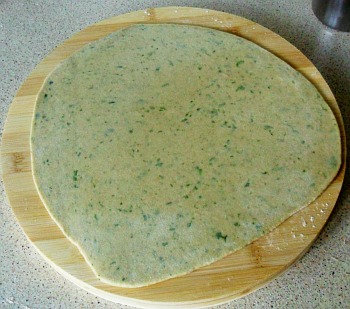 |
Roll it into a roti. As this dough
is stiffer, it is easier work. |
Roll it out to make a roti/puri.
If you use a circular chopping board that is around the same size as your tava to roll it out on, you can make better rotis/parathas.
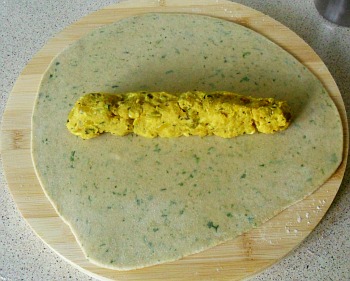 |
Add the filling, so that its diameter is around one sixth
of the width of the roti and it stops short of the ends. |
Wet your hands with water and pick up a handful of filling and squash it into a cylinder shape.
You are aiming for a diameter that is slightly less than a sixth of the width of the roti you have made and a length that is around 2-3cm shorter than the width of the the roti.
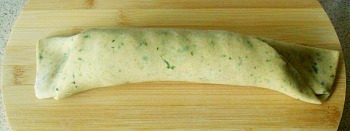 |
Roll it up and seal the ends.
|
Roll the filling up with the roti so that there are no air pockets - or at least so that they are at a minimum.
You are going to roll this out eventually so air will try to escape and will burst your paratha so try to make sure that there are as few air bubbles as you can.
Next, squash the ends so that it is sealed.
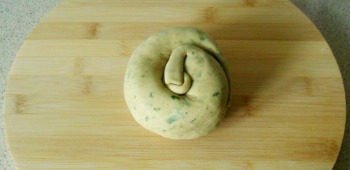 |
Curl it up into a spiral, with the
thicker-dough-end on the outside. |
Now, without adding any flour to it - you want it to stick to itself - roll it up into a spiral.
Then put some four on it.
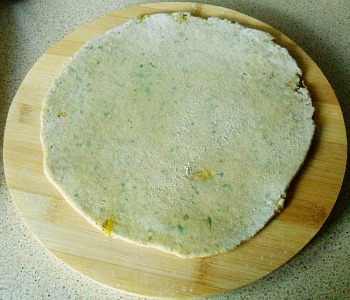 |
Carefully roll it flat again,
taking care not to burst it (too much). |
Now, only a little bit at a time, flatten it out with a rolling pin - or with your hands first and then a rolling pin - so that it is the size you want it to be.
It is inevitable that you will get occasional bursts with any stuffed paratha that you make but try to keep it at a minimum.
When you do get a small burst, put some extra flour on that part and it will form a thin skin there when you fry it.
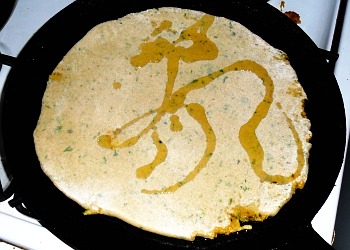 |
Fry on a tava - here in olive oil.
|
Put it on a hot tava with some oil and fry it.
Drizzle some oil over the top of it whilst the first side is cooking.
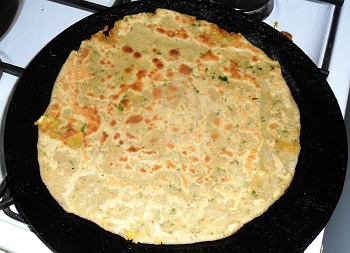 |
And on the other side - like the other parathas,
you can turn it as much as you like. |
When that is ready, turn it and cook the other side.
Like all parathas, you can turn it as many times as you like.
When it is finished, put it onto the cooling rack to cool with the others.
If you cut one in two - like I have in the photograph below, you will - thanks to using turmeric to colour the stuffing - notice that there is a cooked dough bridge between the top and bottom layers of dough.
This gives this type of paratha the advantage of, when you have a loose filling - ie, you didn't use besan to stiffen it up - the paratha will not have the opportunity to just open up like a pastry bag and all of the filling fall to one end. With this type of paratha, that opportunity is only a few centimetres across so even if it does start to happen, the filling is still within a mouthful of where you are eating it from.
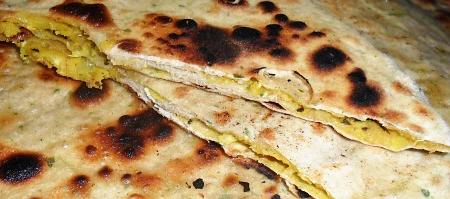 |
Finished. Note that you can see where the top and
bottom layers are joined with a dough bridge. |
