Different types of Paratha
Variations on a theme
As a species, humans love the taste of fried starch. Roti, cooked on a dry tava creates the flavour of fresh, unleavened bread but adding a little oil and frying it opens up a whole range of possibilities.
This page covers the different, practical ways of producing variants on plain, fried roti, letting you choose the best way of producing parathas (or in Punjabi, 'paraunthas') for whatever your filling. So, in seven steps, from plain to complex...
Plain:
 | Just flour and water, fried. You can't get a simpler paratha than this.
|
This is basically a fried roti and nothing more. If you are making roti and have enough, and fancy some fried, this is what you end up with.
It differs from a roti in that it has a harder, less penetrable surface than the dry-cooked roti and as such is less flexible but, it has that fried starch flavour that we all go for.
Cook them at a high enough temperature and the surface breaks out in small bubbles like a papad
|  | | Advantages | Disadvantages |
|---|
- Quick and easy to make
- Sturdy enough to be used as an eating implement
- Easy enough to put pickle or chutney on it to add variety
|
- Limited flavour (only wheat flour) before you turn it into a 'simple paratha' (below) by adding something to the dough before rolling it out
|
| 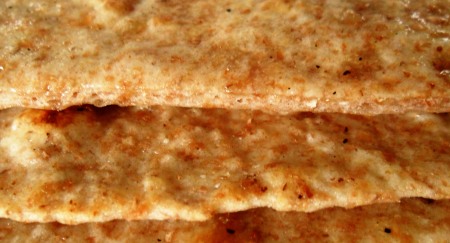 | The cut edge at the top shows you how thin these are.
|
| Example: Plain Paratha /Roti
|
Simple:
 | Mixed in with the flour, this is simple to produce.
|
This is the least complex of the parathas with a filling.
All you do is assemble the filling - whether you choose to have raw ingredients that will then cook as you cook this, or pre-cook the ingredients is up to you - and then add flour and water, mix, knead, rest and roll out.
It is weaker than all of the other parathas because the structural strength is reduced by the filling, getting in the way of it - this is the only paratha type that does not have a continuous layer of dough. As a result, it is relatively difficult to pick up and handle prior to cooking.
On the other side of the same coin, the filling comes into contact with the tava at high temperature so if you have any seeds or nuts in the filling, they will start to roast and give a different flavour.
In addition, these are relatively difficult to roll out - taking a lot of flour. Forget the flour shaker with this type of paratha, you need to sprinkle a lot more on by hand - the gapes between the filling will take up virtually all of that flour when you are rolling them out.
Also, for the reason that the filling is not contained, fillings like potatoes don't work very easily because they have a tendency to mash and mix in with the flour, resulting in sticking to the tava, burning, breaking down the paratha's strength even more by breaking up the flour with non-glutinous flour.
|  | | Advantages | Disadvantages |
|---|
- Simple to produce because there are so few steps
- Wide range of fillings - limited by your imagination and the thickness of the paratha
- Filling cooked to high temperature
|
- Difficult to produce because it is weaker than all of the others
- Difficult to roll out - taking a lot of flour
- Doesn't work well with ingredients like potato
|
| 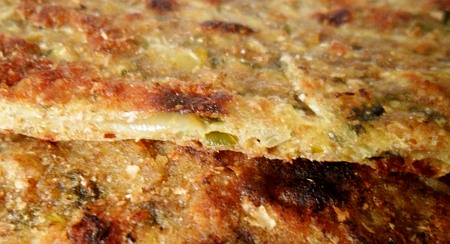 | You can see from the cut edge that the filling goes
right from the top surface to the bottom surface. |
| Example: Torai Paratha
|
One-piece:
 | A roti with filling in the middle and the edges
folded in, with the overlap and sealed. |
This is very easy to produce. Simply assemble your ingredients - it is probably better to pre-cook them all - and make some roti dough. Roll out a roti and put some of the filling in the middle of the roti, occupying the centre third. Fold over the edges and that is it.
Unfortunately, you end up with a thick side and as a result, if you were using uncooked ingredients, the filling is cooked less on the thick side because the heat has more dough to travel through.
One gambit to reduce the thickness of the thick side is to put in more filling - so that the flaps are proportionately smaller - and fold them in, so that they don't overlap as much. Whilst this might seem all right, it is easier to end up with a hole in the middle of the 'thick' side so you need to be careful.
The other way is to roll the dough so that the parts that will form the flaps are only half as thick - or less. That way, you end up with the overlap that you need in order to avoid a hole in the middle, but the thick side is not as thick as it would have been.
You can put anything you like inside the roti, as long as it is not hard and sharp such as uncooked onion and so on. It is also better to try to keep the size down so that you are less likely to pierce the roti when you are flattening it whilst making it, prior to frying.
|  | | Advantages | Disadvantages |
|---|
- Only have to roll out one roti
- Roti not interrupted and is stronger
- Simple to produce
- Not limited with choice of ingredients
- Thick side stiffens the paratha and makes it easier to handle
|
- End up with a thick side
- This side takes longer to cook
- Ingredients only heated through roti so cooks less on thick side
- It is effectively a pastry bag - filling can fall to one end
- Remedy for 'dough-bag problem' - use besan in filling
- They are not round but polygonal
|
| 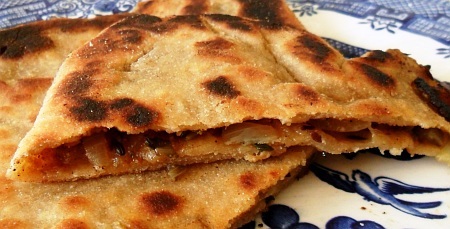 | The filling is nicely contained but if you tip it up,
it can all fall to the bottom or some of it can fall out. |
| Example: Torai Paratha
|
Two-piece:
 | Your filling, sandwiched between two rotis.
|
This is essentially the filling sandwiched between two rotis. There are essentially two ways of producing it:
1. Roll out two, full-sized rotis, wet around the edges, put the filling in and then stick the top roti over the bottom one and press down the edges to seal them; and,
2. Make two, half-sized/quadruple-thickness rotis, wet around the edges, put the filling in, remembering that it should be four times thicker than you need, stick the top roti in place and then roll the whole thing out to its full diameter.
The advantage of the first way is that you aren't rolling it out so your filling isn't going to pierce your rotis and the advantage of the second is that it is easier to get smaller, thicker rotis to match and join. I suggest that you try out both and see which suits you best.
Again, filling heating is only through the dough so your filling needs to be cooked first.
|  | | Advantages | Disadvantages |
|---|
- Roti is uninterrupted and strong
- Not limited with choice of ingredients
- Can make small and then roll out larger
- Both sides same thickness
|
- Need to roll out two identical rotis
- More complex than one-piece above
- Has a ring of non-filled roti around the edge
- Filling only heated through roti - cook first
- Effectively a pastry bag - filling can end up at bottom
- Remedy for 'dough-bag problem' - use besan in filling
|
| 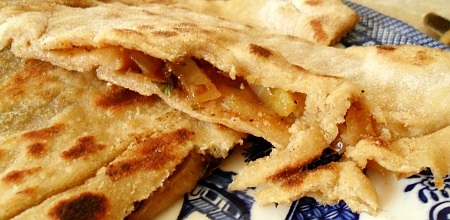 | Filling is contained but is loose.
|
| Example: Torai Paratha
|
Spiral:
 | Filling is contained in flattened 'pipe'.
|
This is a little more involved than the methods above but it produces a good, even paratha.
First of all, a roti is rolled out and then across the middle, a cylinder of filling is laid out, leaving a space at the ends. Then, the top half of the roti is pulled down, over the cylinder and then rolled down and sealed. This is then coiled up to form a spiral and then rolled flat.
One of the problems
|  | | Advantages | Disadvantages |
|---|
- Two outer faces of paratha held together by 'dough bridges' at regular intervals
- Not like a large pastry bag
- Ingredients less likely to fall out - less space
- Can use besan to stiffen up filling to make it roll easier
|
- More complex to produce than parathas above
- Dough layer is thinner
- Choice of larger ingredients makes rolling more likely to cause leakages
- Air bubbles make the roti have a tendency to burst when rolling out
|
| 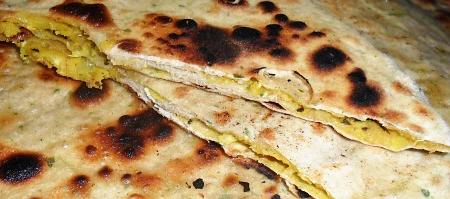 | Top and bottom held together by dough bridges at regular intervals.
. |
| Example: Mooli Paratha
|
Spiral within a spiral:
 | Filling is contained in a rolled pipe.
|
The spiral within a spiral allows you to use a filling that is otherwise quite runny - sauces and so on.
It is made by rolling out a roti and then covering one side of it with the sauce (or whatever you want) and then rolling that up like a small Swiss roll.
Next, that rolled up spiral is turned into a spiral itself and then rolled flat.
One problem is that if you roll it too flat, a combination of the rolling action and the fact that the dough is becoming very thin, will mean that you are just mixing the filling with the dough and you won't get distinct layers.
In order to combat this problem, you can roll out the dough fairly thin to start with - so that only a minimum of rolling is required - and you can use a thicker filling so that mixing is less likely.
Another problem with doing this is that air bubbles will want to burst through the walls of the dough spiral as you roll it out so you need to make sure - as best as you can - that there are no air pockets left in the spiral, once you have made it.
As a result of these problems, you need to choose thicker - less mobile - sauces as fillings and you need to work it out so that most of the rolling is done before the sauce is added to the layer.
Apart from that, these puff up to some extent - a little like a paratha version of puff pastry - and you can have some nice fillings in them that you would otherwise not be able to use.
|  | | Advantages | Disadvantages |
|---|
- Two outer faces held together at regular intervals with 'dough bridges'
- Ingredients held in place tightly - not like a large pastry bag
- Many thin layers make it very flexible but still strong
- Narrow space for filling means you can use more mobile filling
|
- Almost most complex paratha
- Filling needs to have small particle size so as not to pierce roti
- Air bubbles make the roti have a tendency to burst when rolling out
|
| 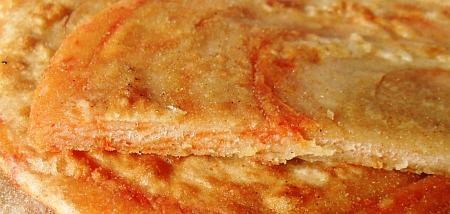 | You can clearly see the red chilli sauce
spiralled in the flattened end spiral. |
| Example: Spiralled spiral Paratha and English Paratha
|
Double spiral within a spiral:
 | Two fillings are contained in separate flattened pipes.
|
This is pretty much like the spiral within a spiral mentioned above.
It is made by rolling out a roti and then covering half of it with the filling.
Then, the uncovered half is folded down, over the covered half, and any air pressed out of it. Next, a second filling is added and the half-circle is then rolled down to form a double-layered dough spiral as above.
Air is removed and the rolled up spiral is then formed into a spiral and rolled flat. Again, this is on the verge of mixing in the fillings with the dough so you need to keep rolling to a minimum.
These can be used so that two fillings are present without mixing with each other and for the reason that there is only a minimum of space available for the filling, mobile fillings such as sauces can be used that you would otherwise not normally get into a paratha.
|  | | Advantages | Disadvantages |
|---|
- Two outer faces held together at regular intervals with 'dough bridges'
- Not like a large pastry bag
- Many thin layers make it very flexible but still strong
- Thin space for filling means you can use two mobile fillings
- Two different flavour layers
|
- Most complex paratha
- Filling needs to have small particle size so as not to pierce roti
- Air bubbles make the roti have a tendency to burst when rolling out
- Getting close to the boundary of practicability with wholemeal flour
|
| 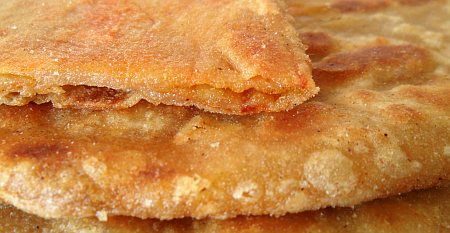 | Two layers, rolled around each other.
|
| Examples: Double-spiral spiralled Paratha
|
Copyright
©2005 - 2021
P.A.Grosse. All Rights Reserved
|