Gilding
Gilding a picture or frame adds elements that step outside the normal characteristics of paint.
Gilding has many applications in art and has been used by various civilisations for thousands of years.
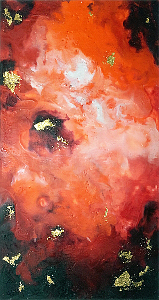
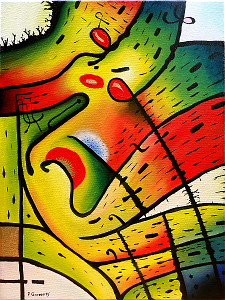
In abstract art, it's use adds another dimension to the experience, introducing areas of the painting that change the way that they reflect light with the lighting in the room and what is in front of the painting and the position of the viewer.
To the right, it is used on an encaustic artwork and in the next, in an area on the lower left and in the red 'eyes' and 'mouth.'
On the far right, in Netherlandish art work and medieval art, it is used to highlight lettering in some cases, adding importance to the text.
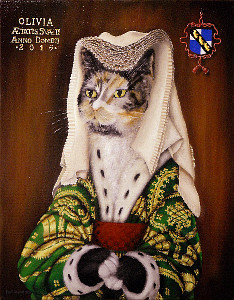
On the right, you can see how it has been used to imitate illuminated manuscript in the painting.
If you cross your eyes so that the images superimpose on each other, you will see how gold reflects light differently.
The ground of the illuminated letter 'P' is mordant gilded gold leaf that has then been painted over to form the letter and the other decorations.
The small coloured spots that reflect are mordant gilded silver leaf that has had a transparent paint applied to the surface.

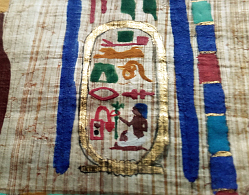
The papyrus on the right has been gilded with shell gold - finely powdered gold in acacia gum that is painted on like a spectacularly expensive watercolour, allowed to dry and then burnished. Shell gold can also be used to patch up small areas of gilding if required.
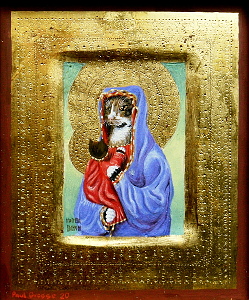
The icon on the far right is tempera on hand-carved, quarter-sawn oak with a sunken field. A lot of this is gold leaf but unlike those above it, this one is water gilded. Traditionally, these images are painted on a ground that has a cloth base - this allowing punchwork to be undertaken. If you are not doing punchwork, you don't necessarily need the cloth but as the field is sunken, it makes for a better sight edge.
So, that is what mordant gilding and water gilding look like. So, what makes a metal surface so special?
Gold v Paint
On the right, you can see how, with paint, an incident ray of light is coloured by the paint and then scattered in all directions fairly equally. This means that no matter what viewing angle you take, roughly the same amount of light, coloured in the same way, will reach your eyes.
In the case of a metal surface, light is reflected in the same way that a mirror reflects light. The shallower the angle the light source has, the shallower the angle of the reflected light.
So, how do we achieve this?
First of all, we need to have a support. This can be solid like wood or glass; or, it can be semi-flexible, such as canvas.
Here are the options relating to gilding methods and types of leaf:
Method Mordant Water Support Rigid: Glass No Yes Rigid: Wood Yes Yes Flexible: Canvas Yes No
Method Mordant Water Leaf 80mm: Au, Ag, Pd, Pt Yes Yes Larger: Cu, Schlag, Sn, Al Yes No Canvas
On canvas, we can only use mordant gilding - water gilding does not use enough glue to keep the metal leaf on the support as it flexes.
Mordant Gilding
With mordant gilding, you need only apply the mordant to the areas that you need to gild, wait for it to become tacky and then apply the leaf - I have applied small areas of around 1mm diameter by putting a finger on a small piece of the leaf and then pulling that across the mordant. The leaf breaks up but the bond to the mordent is far stronger tan that between the leaf and your finger.
With mordant gilding, you will not be able to burnish the gold but the mordant is usually self-flattening so this is normally not too much of an issue.
See the section on ways of sticking the metal to the surface below for more on this.
Glass
Gilding on glass involved using distilled water (rain water will do) with a tiny quantity of gelatin in it (the equivalent of one capsule container - the sort that drugs are administered in) in a pint of water which is then put in a laboratory-style wash bottle or a trigger spray and then applied to the glass in such a quantity that it can run down the glass. This gelatin water degrades over time so by the following day, it needs replacing.
First of all, the glass is cleaned with whiting (calcium carbonate such as chalk or precipitated chalk) damped with some ethanol in the form of methylated spirits or 100% Isopropyle alcohol or IPA. This removed any dirt and grease. After that, water should be able to run down the glass and wet all of it - there should be no areas that repel water.
The leaf is then applied to the layer of water where it smooths out any wrinkles and as the water runs away, it bonds to the glass - the water molecules are small enough to get through the gold which, at that thickness is effectively a semi-permeable membrane but the gelatin molecules are far to big so they stay there and act as a glue. Usually, it isd left until the next day to dry out.
Next, a special, quick-drying paint called 'back up black' or, as an alternative 'Bruswick Black' or Japan Black which is made from asphalt base dissolved in naphtha or turpentine with a bit of rosin and some boiled linseed oil, is applied to the surface of the gold where you need the gold to stay and once that has dried, the other areas of gold are gently rubbed away with a light brush or cotton wool.
The gold is seen through the glass so anything that glues the gold to the glass has to be a tiny amount and essentially invisible therefore mordant gilding is not an option here. Consequently, the 80mm square sheets of metal are the only ones thin enough to gild onto glass with. However, the gold or silver that you use has glass on one side of it and paint on the other to protect it physically as well as chemically so it is very durable.
Wood
With wood, you can use mordant gilding or water gilding. Mordant gilding has already been covered above so here, water gilding will be discussed.
Water Gilding
The support needs to be prepared so that it can take the metal leaf and this is one area that is quite involved.
This is what it looks like...
Steps to Gilding on Oak and Other Woods / Solid Surfaces
Score Cloth Gesso Sand Pastiglia Bole Leaf Burnish Punch Age 2 gold
layers1 gold
layer1. Scored Wood 2. Cloth - linen but can be muslin 3. Gesso - around 4 to 8 coats 4. Sanded - work through to around 1,000 mesh 5. Pastiglia - here left raw but can be shaped 6. Armenian Red Bole - but can be virtually any colour 7. Gold Leaf - one layer on lower part of sample, two on top half 8. Burnished - you can see how much gold it removes from the surface. 9. Punchwork 10. Aged by gently rubbing with 0000 wire wool
Notes :- 1. You only need to score the wood if you are using cloth but it still needs sizing. 2. You only need to use cloth if you are doing punchwork. 3. If you are working with gold, you need a thick layer of gesso, otherwise it only needs to make the surface flat. 5. Pastiglia is optional. 6. There are many colours of bole - the particles give a better surface if they are flat such as with river clays. 7. There are many different types of leaf - some you cannot use with water gilding such as Schlag. 9. Punchwork is optional but like pastiglia, it catches the light at many angles and adds texture to the gold. 10. Ageing is an option. For a frame, it is likely to be varnished and following that, you can age it with Rottenstone. So, let's have a look at what we need to do and what tools and alternatives we need to do it?
- Preparing the ground;
- Pastiglia;
- Different coloured boles;
- Metals used in gilding;
- Ways of sticking the metal to the surface;
- Tools needed - types of tools for different purposes;
- Burnishing;
- Making chemical changes to the surface;
- Punching;
- Ageing;
- Protective layers; and,
- More Ageing.
Preparing the ground
Some supports are already gessoed but they won't normally have the layer of cloth that you need if you want to do punchwork. If you don't have a surface that is already gessoed, this is what to do.
1. First of all, make sure that your wooden surface is smooth and free of dust. Next, score it diagonally, both ways as you can see in the photograph. Some people use a knife to do this but you can get tungsten carbide punches that are just a very sharp point and being a point as opposed to a blade, it will not have a mind of its own as to which direaction it is going to go in - it just goes where you aim it.
Next, you need to size the surface with the glue - or at least a slightly diluted version if it - that you are going to use to glue the cloth and also as the glue in the gesso. Rabbit skin glue made up as per the instructions then diluted 1:1 with water makes a good size. Note that you need to size the surface whether you are going to use cloth or not as it will act as a foundation for the gesso if you are not using cloth. Let that soak in
2. Then, if you are using cloth, cut a piece so that you end up with around 1-2 cm border around where you are going to be applying the cloth and remove any loose bits. Then put the cloth in the size and push it under so that it gets soaked all of the way through. Next, wring it out and place it on the scored wood and apply any more glue if necessary and work from the centre, towards the edges, flattening it out and pushing out any bubbles. If you discover any loose bits of thread that you have missed, peal it back, remove the bits and start again. Take your time and get it right. Put it to one side and let it set.
Now, remove any surplice from the edges with a pair of scissors, finishing off with a sharp knife.
3. Next, make up some gesso with a PVC of roughly 1:1 (against the solid glue that you started with) and apply a number of thin coats, running one way and the next coat running at 90 degrees to that and so on, allowing each coat to lose its glossiness before applying the next.
If you apply coats too soon, you will disturb the previous layer. If you apply coats with too much time between them, it will take longer than it needs to. Once you have sufficient gesso on the surface to obscure the cloth or the wood grain, you need not apply any more.
Now give it a day or two - depending upon the temperature - to dry.
1 2 3 4 4. Remove the surface by sanding or scraping or both.
Sanding - Sand it down using a piece of high quality sand paper held onto a flat surface, such as a sanding block, until you have sanded down to the last bit of unsanded surface. The sand paper you use should not let bits of sand become unattached because they will get caught by the sand paper and scour out furrows that will be difficult to get rid of. Aluminium oxide paper is usually quite good because it is bonded well to the paper.
You can see where you have original surface by getting the smallest quantity of graphite and rubbing it onto the surface. Being dry and without any medium, it will not work its way into the body of the gesso, just remain on the surface. As you sand away, you will be able to see where is left to sand. It is worth pointing out that you really should consider adding the graphite outside because it is pernicious and will get everywhere.
Once you have removed all of the original surface, you can either continue sanding, using progressively finer papers until you get to around 1,000 mesh, or, you can use a scraper to scrape away the roughness.
Scraping - This is performed by pulling the scraper across the surface in order to remove any parts of the surface that protrude, leaving an almost mirror finish.
The scraper is held had around 45 degrees and pulled across the surface - addition of graphite in the same way as sanding, above, helps you to see where there is still work that needs to be done. Once you have finished, the surface has such small surface features that sanding will not get it any smoother.
You can get special scrapers for this job. The scraper has a gently curving edge and is fairly flexible so that you apply pressure and bend it to form a straight edge when using it.
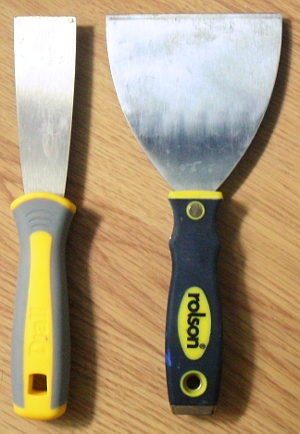
Here, I have used two normal paint stripping scrapers, the ones with the smoothest edges on the shop shelves, and then ground the edges using a 1,000 grit diamond surface so that any irregularities were removed and so that the corners were not so sharp.
Scraping from the very beginning of the process is a lot of hard work and it is easier to get down to an original-surface-free surface with sand paper and then to get a smooth surface with a scraper.
There are some circumstances where a scraper is not appropriate such as in the corner and edge curves on the sunken fields of icons but apart from that, the scraper gives the best results for the finish and the sand paper on a block gives the best results for flattening the ground in the first place
Pastiglia
5.
Pastiglia is used on frames to produce features that catch the light but they can be shaped and then wither gilded or painted, adding a third dimension to an otherwise flat landscape.
Pastiglia is produced by painting a fairly thick gesso onto the surface of the frame/painting which can then be carved or field if necessary. It is inflexible so it is not suitable for supports such as canvas.
See the page on pastiglia for more details on the subject.
Different coloured underlayers / boles
6. Bole performs two jobs: making the layer under the gold a uniform colour so that under-drawings and so on do not show through; and, making a flat surface upon which to gild.
A single layer of gold leaf is fairly transparent and as you can see from the sample above, putting a second layer on top definitely adds to the depth of the gold colour - unless you are going to age it by abrading it. As a result of this transparency, the colour of the layer beneath the gold becomes fairly important.
You can see from the samples on the right that whilst the area with intact gold on it is largely unaffected by the colour of the bole, when you start to do physical things to the gold such as burnish it or abrade it, the colour of the bole starts to come through.
In manuscripts, the original bole was minium or red lead oxide. Minium has been around a long time and the word 'miniature' is derived from the word 'minium' in the context of the tiny illuminated illustrations done on velum where the gilding was done on a minium ground.
Another popular colour for bole was cinnabar or vermilion which chemically are the same but the latter is the synthetic version.
Armenian red bole is ideal for the job of providing an underlayer for gold as it is still at the warmer end of the spectrum but it has the advantage of its particles being like little flat plates that fit together to form a very smooth surface.
Synthetic iron oxide also forms a reasonable surface as to many other powders. For instance, if you want to paint pastiglia or other raised surfaces with yellow ochre as a bole, then with gold bein slightly transparent, they will, in effect, be highlighted.
You can, of course use any colour and with silver, blacks and blues will make the surface a colder colour. With the thicker leaf such as schlag, copper and so on, the colour of the bole becomes less of an issue unless you are planning on a lot of ageing through wearing it down with the iron wool.
Metals used in gilding
The word' gild' clearly applies to gold but gold is not the only element that has been used in the past. Other metals such as silver and tin were used in medieval times along with copper. More recently elements such as Palladium, Platinum and Aluminium have been used along with alloys such as Schlag metal which is in effect brass.
Gold's high malleability make it ideal to beat into very thin sheets with regular modern gold leaf being in the order of 10 microns thick - ie and 80mm square sheet weighs around 15mg.
silver can also be beaten that thin and gold, silver, palladium and platinum are sold in books of 25 loose 80mm x 80mm sheets, separated by a special peach coloured tissue paper.
Copper and tin are supplied in stacks of sheets, separated by special tissue paper but the sheets are bigger, reflecing their greater thickness.
Finally, schlag metal comes in sheets that are four times the area of standard gold leaf in piles that are not separated by tissue paper but instead, are staggered so for 160mm square sheets, the second sheet is offset by around 20mm and the third over the first and so on. You separate the sheets by laying the gilder's knife over the top sheet so that around and inch or so from the offset edge can be seen then blow that edge towards the knife and it lifts up and wraps itself over the knife, then you can pull the single sheet away and put it on the gilder's cushion to be cut up as appropriate.
Schalag, or Dutch metal is available in a number of variants with different amounts of copper in it and therefore different colours.
Ways of sticking the metal to the surface - Gold Size
Water- based
Water Gilding - The glue that sticks gold to the surface is called a mordant and in water gilding, that glue is gelatin so strictly speaking, water gilding has a mordant in it as well but with water gilding, the concentration of mordant is so low that it is not called mordant gilding.
Glass - The concentration in the case of reverse gilding on glass is one gelatin capsule per pint of distilled water. The glass is cleaned using methylated spirits and chalk and then the design is fixed to the viewing side of the glass so that it can be seen through it. Gold leaf is then floated onto the surface of the glass by spraying, squirting or painting the water onto it in excess so that it runs down and then the leaf is applied and a little more water is applied, just enough so that the leaf flattens out and spreads out. It is then allowed to dry. Sometimes a second layer of gold leaf is added. Next, the gold is painted over with black or yellow paint - the process being called 'backing up' then, once that has dried, excess gold is gently rubbed off and any further painting is done such as outlining.
Paper, Parchment, Papyrus and Gesso - The surfaces of paper, papyrus and gesso are a porous mesh, held together by a small amount of glue and parchment is treated so that it is similar so putting a mordant on it that is not solid will mean that the mordant will soak into the surface and spread, out of control and when you come to put the gold on it, it will go where you don't want it to go. So, you can only really use a solid with a water solvent such as gums that are derived from the saps of various plants such as Gum Ammoniac on the right or the gum from the acacia plant known as Gum Arabic. There are others and if you really want to get modern, synthetics such as PVA glue will also work but again, this is a resin that has a water solvent so that it can be diluted and then applied.
Another factor to be aware of is that if you add too much water to paper, when it soaks it up, it will expand and you will get an irregular surface.
The way this normally works is that you make up your glue and then you put it on the surface and let it dry. Then, you breathe on it - this can be aimed at a specific area by using a straw - but the idea is that you make the surface of the glue tacky enough for gold leaf to stick to it, you then apply the gold leaf, let it dry and then burnish it.
Another option with gesso or bole made with a high glue content is to paint on a 50:50 mixture of water and alcohol. At 50 per cent, the gelatin will not dissolve in the water so the physical action of painting will not disturb the surface. However, the alcohol is a lot more volatile so that will tend to evaporate more, lowering the concentration of alcohol and allowing the surface gelatin to start to dissolve in the small amount of water that is left, making it sticky.
One thing that you can do with this if you are not producing artwork that end up in a book with other leaves of paper pressing against it is treat the glue like pastiglia - it doesn't have to be a imperceptibly thin layer on the surface - and you can make beads of it that you can then gild.
Oil-based
The original way of sticking gold to a surface using an oil-based glue was to add a little litharge (lead oxide) to head-bodied linseed oil and when that had set, the gold was applied. Of course, you need to be careful with lead compounds, not to contaminate anywhere with them because lead is a neurotoxin and there is no safe non-zero dose.
Litharge is what you get when you take lead white and heat it up so as to drive off the carbon dioxide and water, leaving lead (II) oxide or PbO and is the peachy coloured powder in the jar on the right. This is different to red lead oxide which is red-orange coloured and slightly more oxidised and has the formula Pb3O4. Both will make the oxidation/cross linking of boiled linseed oil speed up and this happens to such a great extent that you cannot use them as oils unless you prepare them when you use them as they will go solid in the tube. This also applies if you are mixing them with acacia gum to use as a watercolour pan - it all goes solid in the pan and it is very difficult to add water to them.
Instead of reacting oil to make a sticky surface, you can use a hydrophobic resin that is dissolved in a solvent and let the solvent evaporate away. One such example is the gilders size like the Japan gold size on the right.
You can make your own but if you use just a tree resin such as colophony (pine resin) it will tend to crack over time. With the gilders backing up paint, linseed oils was added to solve this problem so you can add some of that but if you are gong to do that, you might as well use just linseed oil with litharge.
Paint on the gold size, wait until it has the correct amount of tack and then put the gold on.
The problem with oil-based sizes is that the surface is too flexible and you cannot burnish the gold to a high finish, whereas you can with water-based sizes.
Tools needed - types of tools for different purposes
So, we have the metal leaf in a book and we have prepared the surface so how do we get the gold onto the surface?
You can literally open up the book and put the gold directly onto the surface but, as you might imagine, there is not a great deal of control involved in that process. The gold is exceptionally thin and will tear, crinkle, and so on. It is always in 80mm squares and it is unlikely that the gilding job will want just 80mm squares so we need to be able to cut it as well - remember that it is also expensive so its efficient use is called for.
So, we need a way of handling it that uses forces that will not damage it.
The gilders cushion provides a surface that is almost flat - it is raised slightly in the middle so that you can get underneath it with a knife and also so that the cushion's surface can be kept taught. It is usually made from suede leather and has a springy surface so that with the gold flat on the surface, you can press the knife into the surface and slide it under the gold without touching the gold. It also has an elastic loop underneath so that you can slude your hand in there to hold it. One further feature is the shield around the end of it. This is to keep draughts away from it. There seems to be some sort of macho thing about not needing one of these but unless you can guarantee there will be no draughts, you will need one. As an indication of just how sensitive to moving air the gold leave is, the sun shining in through a window will create enough of a draught through convection that it will blow gold leaf around.
The gilder's knife is a long, straight, not particularly flexible knife that isn't particularly sharp when compared to knives that you might use in the kitchen. It is, however, long and straight and doesn't taper which means that you can slide it under the gold without damaging the gold. Another feature is that it isn't particularly sharp. However, on the scale of gold leaf - which is around 10 microns thick - it is particularly rough. To cut gold that is on the cushion, the knife pushes it onto the suede, which grips it, and the knife then tears the leaf as you drag the knife along it.
Of course, being so thin and fragile, any grease that is there will make it stick and ruin the whole process so before anything is done, the knife and the cushion are cleaned with a fuller of some type. The fuller is grease-free and has a high surface area. Sprinkle some of it - about the same amount as you can see in the picture and use the knife to spread it all over the cushion, wiping all of the knife blade as well, then remove it by gently scraping it off with the knife.
So, now you can pick the leaf off the book by placing the knife on the leaf, around a third of the way along it and gently blowing across the leaf so that it gets picked up and folds over the knife, then you put it gently on the cushion.
On the cushion, you can use the knife to cut it up into pieces that are a bit bigger than you need. Don't cut it to the same size in an attempt to save on the gold because you will just end up using more gold.
On the right, you can see some schlag metal cut into pieces for gilding a frame.
Now that we have the metal leaf on the cushion and cut into pieces that are the right size, we need to be able to pick it up and put it on the artwork.
If you are gilding small areas - around a square centimetre or less, you can pick up the gold using a dampened '0'-sized (or finer) paint brush. For larger pieces, you should use a gilder's tip.
On the right, you can see two gilder's tips. The one on the left is a synthetic tip and on the right is a traditional tip. Gilder's tips are available in a number of widths so if your line of work means that you never handle anything larger than a couple of centimetres, you can get one that is the right size.
Traditional Tip - This tip is made from hair and it is used by brushing it lightly across the hair on your head (any, including beard) to pick up tiny traces of grease. There is enough grease on the tip to hold onto the gold, allowing you to pick it up and transfer it to the artwork. In dry conditions, you can get some static on the tip which will pull the leaf off the cushion and you can end up with it either positioned badly on the tip or creased or folded. To counter this, you should pick the leaf off the cushion by holding the tip a couple of centimetres above the leaf and then moving it down relatively quickly onto the leaf. Being made of hair and you brushing it on your hair means that you shouldn't get very much transfer of electric charge but it can happen sometimes.
Synthetic Tip This one uses static electricity to pick up metal leaf. It is used in the same way as the natural tip but the grease it picks up is nothing when compared to the effect of the electric charge that it picks up. The fibres of the tip are very coarse when compared to the natural tip so it is better for thicker metal leaf such as schlag metal for which it is ideally suited.
With the synthetic tip, when you move the tip towards the metal on the cushion, you can see the metal start to move up as the electrostatic field increases. Again, you need to take car to position the tip so that it holds the leaf the way that you want it.
Applying the gold
To recap, we have picked the gold out of the booklet, put it on the cushion using the knife and cut it to the right size and have picked it up on the tip.
Next, if it is a flat surface that you are gilding, hold the leaf so that it is at a slight angle with the tips of the hairs on the tip closest to the surface and once the gold comes into contact with the surface, it should pull the gold off the tip. If you are using a thicker leaf such as schlag and are using an oil- type mordant, you might need to move the tip along so that the leaf is pulled off the end of the tip.
If it is a linear, curved surface such as on a frame, use the ends of the fibres on the tip to push the leaf into the valleys because where it next touches, it will stick and form a bridge - this is less likely if you are water gilding as the gold tends to flow across the surface whereas with mordant gilding, the surface is solid.
Where you have a surface that is convex or concave, you are better off using smaller pieces and using the tip to fill in any gaps.
Once it is on the mordant, use a dry gilders mop or a soft brush or a piece of cotton wool to carefully push the leaf into place. When you are doing this, make sure that you don't apply any sideways force as this will lead to tears in the leaf.
Next, let it dry and then brush away any gold that isn't where it is supposed to be. Where you have a joint between leaves, brush away from the leaf on top - this will help to prevent any tendency to pull leaf away from a join which would open up gaps where the bole would be visible.
Burnishing
You cannot burnish gold that is on an oil mordant - the surface is too soft.
On your gelatin/ plant resin gilded surface, use an agate burnisher to rub the surface of the gold - gently at first and then increasing in force - to get it to shine. The gold payer or in the case of shell gold, the particles of gold, are a bit exposed on the surface and as you run the burnisher across them, it smears the gold into the particles next to it to form what looks more like a continuous layer of gold.
Mirror-like finishes can be obtained which might be a goal but a surface that is just a gold-coloured mirror is not as exciting as one that has features that catch the light which is where pastiglia and punchwork come into their own.
Making chemical changes to the surface
e Gold, silver palladium and platinum are fairly inert - they appear in nature as noble metals whereas all of the other metals that we use as leaf can also occur as salts. Silver will slowly react with sulphides in the atmosphere to produce sepia as happens with silverpoint drawings and copper will tarnish very easily.
One thing that you can do is to take advantage of this by introducing a small quantity of a chemical to the metal leaf - usually copper or schlag although silver is another candidate. Make up a dilute solution of sodium sulphide - follow the instructions on the packaging and apply it to the metal.
This makes a layer of sulphide on the surface which is not quite thick enough to have a colour of its own but is thick enough to interfere with light, giving it colours from a straw-yellow, through magenta to cyan and so on. Once you have the colouring that you want, wash it off and clean it.
Beware that sulphide can be very dangerous because if you mix it with acid, it will give off hydrogen sulphide and the first thing it does is paralyse your sense of smell and after that, it can kill you so only use it in a place that has strong extraction or better still, outside.
Punching
Punchwork is another way of catching light and turning the otherwise flat experience of a mirror-like surface of gold into something that is a bit more interesting to look at than a mirror.
You can see from the test sample on the right that it, along with the pastiglia, catches the light in a way that plain, burnished gold simply cannot do.
See the page on Gold Punchwork for more details about this.
Ageing - Causing Physical Damage
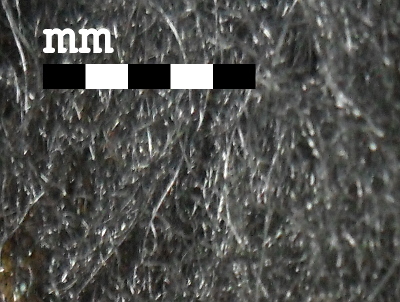
One thing that happens to gold leaf is that it gets worn away by people touching it, it banging into things and so on. Whilst you probably wouldn't want to do this to your artwork unless you were deliberately trying to make a piece of art look older than it was, you might want to do it to the frame that you have made. Iron wool like that Trollull OOOO pack on the right is very fine and if you take a small piece of it, around the size of a two pence coin and rub it gently over the burnished gold, it will start to wear it away, down to the bole. Any irregularities that are in the surface will show up so pastiglia will show bole sooner than the flattened areas and so on.
In the test sample on the far right, you can see the un-aged strip on the left and aged strip on the right.
The upper half of the test strip has two layers of gold leaf on it and the lower has only one. You can see from the aged strip that it looks pretty similar for both the single and double gold layer parts of the sample so the conclusion that we can take from that is that there is little point of putting a second layer of gold on an area that is going to be aged in this way.

Protective layers - preventing wear and oxidation (ie, physical and chemical attacks)
Once we have finished producing the artwork/frame, it needs protecting. If the gold is on the painting that you are going to varnish anyway, there is not much of a problem.
However, if you are not going to protect a painting and you have used a metal that will react with its environment such as silver or copper, you will need to put it behind glass if you cannot varnish it.
Frames are usually varnished and that makes a good protective layer to shield the metal leaf from physical as well as chemical attack.
More Ageing
However, a frame that has a bright golden polished look about it is going to steal the show as far as your picture is concerned so it needs to be toned down a bit and also look as though it has been around for a while. So, how do we age things like this?
One thing that happens when things are around us is that they gather dirt. You tone down a frame like this and take a lot of the glossy look away by using something called 'Rottenstone.' It is simply a very fine powder that is normally used for polishing metals such as silver and gold, put into an acacia gum solution and then painted onto the frame, into all of the corners. It is then largely cleaned off so it looks as though the frame has been cleaned but a while ago. The rottenstone gets into the surface of the gloss varnish as well and makes it less glossy. It is one of those things that if you put on too much, you can wipe it off without causing any harm.
So, now you know how to gild.

All images and original artwork Copyright ©2019-2020 Paul Alan Grosse.


