PC Plus HelpDesk - issue 215
This month, Paul Grosse gives you more insight into
some of the topics dealt with in HelpDesk and HelpDesk
Extra
|
 |
HelpDesk
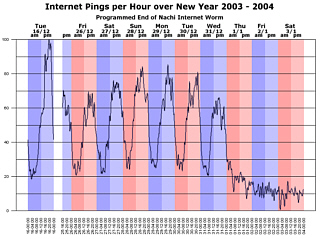
Correcting PC ClocksThey say that a man with one watch knows exactly what the time is but give him a second one and he will never know. As you can see from the Nachi graph below, computer clocks are all over the place and not knowing the time - to the nearest second at least - can be a disadvantage when trying to interpret computer logs. This was one thing that stood in the way of finding out just what went on and in what order in the case in Clifford Stoll's book 'The Cuckoo's Egg' (various ISBNs) which describes how an astronomer uncovered a real-life hacker. About Time (a nice little freeware - careware program)
from Paul Litus http://www.arachnoid.com/abouttime/index.html
is a It uses NTP which is provided in two strata - 1 and 2 (surprisingly). Stratum 1 is for other time servers essentially and stratum 2 is for us. It is best to choose a time server that is fairly local so that you are not falling victim to network latency so try a few local ones and look at the ping times. You can get a list of the time servers at a number of places on the Internet. A good page about this is at http://www.eecis.udel.edu/~mills/ntp/servers.html and, unless you are thinking about setting up your own series of time servers, you should pick a server from the stratum 2 list. The list of servers at http://www.eecis.udel.edu/~mills/ntp/clock2a.html is in TLD order (rather than language) so in the UK, look under UK and not EN (except for USA NTP servers which are under US rather than COM, NET and so on). |
IPSec and SSL VPNsIPSec and SSL Virtual Private Networks are both ways of communicating reasonably securely over an open public network. Each, through a series of public key cryptography supported key exchanges provide a per-session, secret key encrypted 'tunnel' which will detect when packets have been tampered with. In addition to this, the packets they do produce will make no sense if they are intercepted and read. So, what is the difference?
In effect, the user's machine is able to access
network resources (effectively) directly. These VPNs are
best suited to remote offices or homes of users that need
direct access and whose environment is stable enough to
set up the firewall/VPN and leave it in place.
The advantage of this is that the client machine could
be anywhere such as in a library or a cybercafe. The
disadvantage is that these machines are usually
configured to accept and scripts and could have any
key-logging software on them - if you were the owner of a
cybercafe or responsible for a local authority's IT, you
would want to know if someone is downloading stuff they
shouldn't. One main weakness to both is that they can suffer from man-in-the-middle attacks. This is where somebody pretends to be one end of the VPN, receiving the traffic and passing it onto the true end - it thinking that it has a genuine client. The unfortunate fact is that the tunnel is breached part way along and data can be siphoned off or even tampered with. With a machine on the internal side of a firewall on an untrusted network, ports can be passed through such proxies transparently. |
Trojans in emailsThe following is the full text of the email: hi, I am from Spain and you'll don't believe me, but a trojan horse in on your computer. I've scanned the network-ports on the internet. (I know, that's illegal) And I have found your pc. Your pc is open on the internet for everybody! Because the smss.exe trojan is running on your system. Check this, open the task manager and try to stop that! You'll see, you can't stop this trojan. When you use win98/me you can't see the trojan!! On my system was this trojan, too! And I've found a tool to kill that bad thing. I hope that I've helped you! Sorry for my bad english! greets =================== End Part 1 / Begin Part 2 ===================== Name: remove-smss_tool.exe % Part 2 is binary ========================== End Part 2 ============================= Instead of pretending to be a security advisory from a large, authoritative organisation, as you can see, it is written from the point of view of the curious but harmless/helpful idiot who had stumbled across a problem and just wants to help. If you come across a suspect mail with an attachment, open it not into the usual viewer, but, in Outlook Express, by right-clicking and selecting Properties, then Details (tab) then Message Source... (button) and a window will open with just the text, including any code, but without executing it. If you take the first line of message (or the first part of it) and put it into a search engine such as google, you can often find that somebody else has found it and written about it (if it is a virus). In this case, it is: W32/Sober-C This virus attacks by a number of methods including email and has a variety of mail messages with different files. Lists of them are on the Sophos site amongst others, including how to get rid of the mail.
Of course, (I would have said that 'it goes without saying' but looking at the way these things spread, it does not) you should never execute an email attachment unless you are sure - you have checked with the person sending it, you were expecting it, it is the same as the one that was sent (check the MD5 hash) and so on. |
Keyboard shortcuts in KDEIf your mouse falls over for some reason, you will find yourself in a situation that you could have prepared for - you need to know the keyboard shortcuts to navigate your way around th GUI. If you have already saved all of your work, you can shut the system down by pressing [Ctrl][Alt][F2] to bring up a full screen console (any function key from [F2] to [F6] will do - just in case you were wondering, [Ctrl][Alt][F1] brings up your initial screen that you would have seen at bootup by pressing [F2], [Ctrl][Alt][F7] brings up the fist GUI, if nobody else has logged in, this will be the only GUI session going, [Ctrl][Alt][F8] and [Ctrl][Alt][F9] bring up two more GUI sessions if they are active and [Ctrl][Alt][F10] brings up a rather useful log of events.) log in as root then type # INIT 6 Which will set the runlevel to 6 and shut down the computer.
Go to Control Center and look under Regional &
Accessibility/ Keyboard Shortcuts. Here, it is possible
to select an existing scheme, edit, create and remove
them.
|
Adding new buttons to IceWM and the filesIt is possible to change the desktop that a window appears in by right-clicking on the title bar and selecting a new desktop - or all. However, it is almost always more convenient just to click on the sticky button.
To remedy this - you could do this for any theme - locate the directory with the files in it - on my system it is /opt/kde3/share/apps/kwin/icewm-themes/microGUI - and then copy two suitable buttons into the same directory, renaming them as you do it. Here, I have chosen the hide buttons - hideA.xpm and hideI.xpm. By using buttons that already exist, most of the work is already done - making the new buttons look part of the existing theme and so on. Also, if you chose one that has a similar shape to the buttons shape you are going to create, you are again cutting down on the amount of work you will need to do. One thing to be aware of is that many button themes
are designed with specific positions already in mind for
the buttons so the close button is almost always designed
to look as though it is going to go right-most. I found
with this that the hide button was destined to go further
to the right than the depth button so I opened upt the
minimise buttons and copied the right-hand half of the
button background into the new depth buttons. It is
usually only possible to do this once you have the
buttons installed so don't worry about doing it at this
stage - you can always come back to it.
Note that it is possible for users to put the buttons
in the order that they want and in most themes, this does
not matter. In this one it does (the background changing
slightly in the buttons on the right - enough to notice
though - and the menuButton on the left being completely
different). It is up to them but that is their problem.
Next, click on the theme you have just edited and them Apply again and it will be used (assuming that you have done this properly - one mistake and it will not allow it so be careful not to delete other files or make mistakes in the configuration file). In the screenshot, you can see microGUI with a depth
button. Below, you can click on the Aqua icon to copy the
.xpm files to wherever you want - this will save you from
editing them yourself. Remember to add the 'd' to the
default theme file for microGUI if you are going to do
this or you will not see them Have fun. |
LAN IP AddressesRangesInternet IP addresses (apart from the experimental ones) run from 1.0.0.0 to 223.255.255.255 with a few holes for special reasons. Whilst it is nice to have Internet access on a LAN, there are usually a few devices that do not need to see the Internet - printer servers and so on - so it would no only be wasteful if everything that was on your LAN has its own Internet IP address, it would also be an immense security risk. Supposing you had 12 IP addresses - a few servers that were only for LAN use, a few network printers and so on amongst a population of computers. If you had Internet addressable IP addresses for each when only a few of the computers actually needed to venture onto the Internet, then people from anywhere on the planet would be able to interrogate your network server or your printer and so on. It would also use up the available IP addresses very quickly. With this in mind, this is where local addressing for LANs comes into its own. If your gateway knows that a certain range of addresses are never going to be found on a particular connection it can then keep that traffic away from that connection. In this way, a local addressing scheme is used so that machines that can function perfectly well without any interaction from the Internet can do so. For a class 'A' LAN, you can start your network with 10 in the first octet (eight bits) of the address and the gateway will not pass connections to these machines out onto the Internet (ie 10.x.x.x). For a class 'B' LAN, use the range 172.16.x.x to 172.31.x.x and for a class C network, use addresses in the range 192.168.x.x. This is why LAN cards for domestic use say use the IP address 192.168.0.1 or 192.168.1.1 for the machine (usually because the person installing it is doing it for the first time so there won't be any other addresses on the network at that point and when there is, they will have figured out enough of what is meant by then to experiment a bit and get it right). There is nothing (usually) to stop you from using class B addresses on your LAN if you really want to. Subnet MasksYou will notice that the IP addresses for class B and C LANs both change in the third octet but the subnet masks are not the same. For a class B network the subnet mask is 255.255.0.0 and a class C is 255.255.255.0. This means that on the face of it, you can have a network range of, say for a given network, 172.21.0.0 to 172.21.255.255 for a class B and 192.168.15.0 to 192.168.15.255 for a class C. You can see that for a given LAN, you have 256 times more addresses to play with on the class B network. Of course, you don't get all 256 addresses to play with as 0 (as in 172.21.0.0 or 192.168.15.0 in the above examples) is the network address and is used in a particular way by the system and, there is also the broadcast address which normally has all of the network address, non-subnet mask bits set to 1 so for a class C, that is 255 and for a class B, that is 255.255 (as in 172.21.255.255 or 192.168.15.255 in the above examples). To get the network address, you need to take the IP address and AND it with the subnet mask. Thus the example of 192.168.15.26 ANDed with the subnet mask of 255.255.255.0 will give 192.168.15.0 as the network address. If the gateway ANDs the IP address with the Subnet mask and gets your internal LAN network address, it will not pass the traffic out onto the Internet or into the next network. It is also useful in some instances, such as where you have a busy internal network, to have such a gateway or packet filter (first generation firewall) next to the firewall so that the firewall does not have to bother investigating internal traffic and can concentrate on looking at the traffic you bought it for. Looking at it all graphicallyTo make all of this clearer, lets look at it graphically...
A host address such as this is sometimes written as 192.168.1.15/24 You don't have to use a whole octet of 0s for your subnet mask. You could have 255.255.255.240 which would give you a network with 13 hosts and a gateway like this...
This host address could be as 192.168.123.150/28 You can make this interesting because, you might find that you do not have to have the end of the subnet mask as a contiguous block of zeros. If you still need around a dozen (or 13) machines and the network needs a network address, a broadcast address and a gateway address (ie 16 addresses in all which, being binary, can be represented by 4 bits) you might find that it doesn't matter if they are contiguous. If there are 4 bit-sized holes in the subnet mask, you can have your 16 addresses as long as the first section of the address remains intact. Supposing your subnet mask was 255.255.255.149...
So, the valid numbers in the last octet for this hypothetical network are:
Forget about using the slash notation with this as it becomes nonsensical. Note that where a subnet mask bit is set, the network address bit stays the same in the host address. If you are going to have a go at setting up a small network like this, make sure that you have plenty of time to get it working again should there turn out to be a problem with it for some reason. Also, note that DHCP servers like to have contiguous IP address blocks to assign numbers to so you might find that it does not work with your DHCP server. It could be that your DHCP server uses the subnet mask to check for valid suggestions but it might well not. Remember, you will never know unless you have a go. |
|||||||||||||||||||||||||||||||||||||||||||||||||||||||||||||||||||||||||||||||||||||||||||||||||||||||||||||||||||||||||||||||||||||||||||||||||||||||||||||||||||||||||||||||||||||||||||||||||||||||||||||||||||||||||||||||||||||||||||||||||||||||||||||||||||||||||||||||||||||||||||||||||||||||||||||||||||||||||||||||||||||||||||||||||||||||||||||||||||||||||||||||||||||||||||||||||||||||||||||||||||||||||||
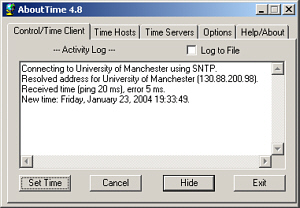 free
download that plugs into any time server you want (as
long as you have permission - some prefer confirmation
first).
 An IPSec VPN
effectively places the user's machine (or a network that
they were linking) onto the network at the other end of
the tunnel. It goes without saying that it is important
that there are firewalls at both ends of the VPN
otherwise it would be pointless.
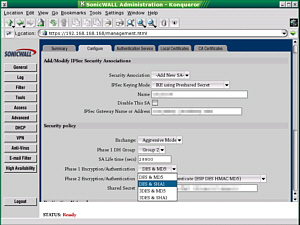 The screenshot on the
right is a typical IPSec VPN configuration for one that
is built into a hardware (appliance) firewall. Once
configured, it can be forgotten about and with this in
mind, they can be configured at the workplace before
being given out to the employees who need to have them at
home..
 With an SSL VPN, the
software runs on the computer and connects through its
firewall (if it has one - it could be just a desktop
firewall), across the Internet, through the firewall at
the other end and then to a server. The server fetches
and processes any data that is required and the user
never has any direct contact with the machines it is held
on.
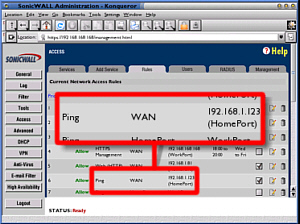 Anyway, this meant
that during the last half of 2003, ISP's subnets were
cluttered up with pings (they were firewalled at the ISP
gateway) and if you monitored them, you could see that
only a few came from outside the ISP's subnet.
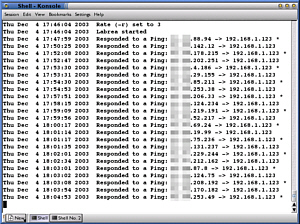 Or at least that is
what the infected machine thinks. In reality, Labrea
never acknowledges anything other than the original ping
(tying that infective thread up with trying to take the
next step of its infection process but only being able to
do it slowly) and if you look over the log, you can see
that machines eventually give up waiting and ping again,
some time later. It is a little like taking some
unsolicited visitors that knock on your door and putting
them in a room. You sit them down and tell them that you
are just nipping out to get them a drink and you never go
back. Ever. Sooner or later, depending upon how polite
they are, they will leave of their own accord but in the
mean time, they will not have been out knocking on other
people's doors and annoying them.
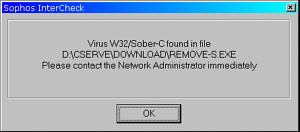 Here, you can see
that an up-to-date on-access scanner has caught the virus
- this is just Windows Explorer attempting to read enough
of the file to get an icon to display.
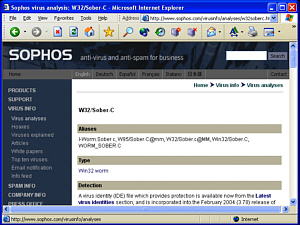 Anti-virus vendors
host many details about various viruses and anything that
you are not too sure about is well worth a check.
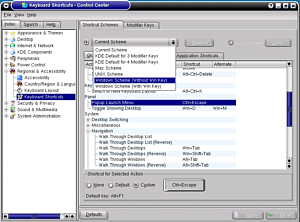 Anyway, rather than
me go on here about how you can press this and that key
combination, I will tell you where to look and how to
change the scheme
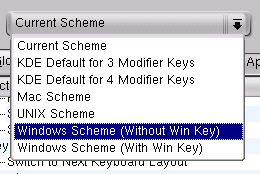 For those who want
more of a Windows feel, there are two Windows themes
available.
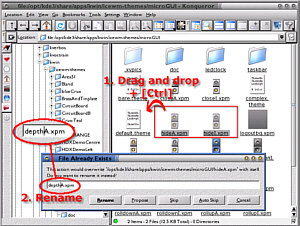 One of my favourite
IceWM themes is microGUI which, as you can see from the
screenshot on the right, does not have a sticky (depth)
button.
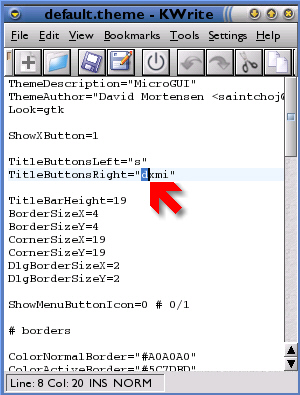 With the images
sorted out, you can now add the 'd' to the
TitleButtonRight section in the default.theme file,
placing it where you want it to go.
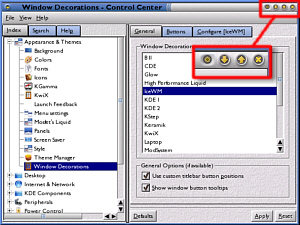 Back in Control
Center, go to Appearance & Themes/ Windows
Decorations/ General (tab)/ IceWM (list box), then click
on the Configure [IceWM] tab and if you are already on
microGUI (or whatever the name of the theme you are
modifying is) then click on another theme and then the
Apply button (bottom right).


