PC Plus HelpDesk - issue 229
This month, Paul Grosse gives you more insight into
some of the topics dealt with in HelpDesk and HelpDesk
Extra
|
 |
HelpDesk
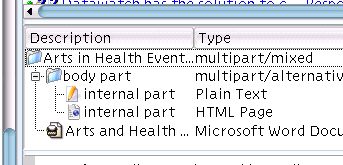
Blocked File Attachments
The example on the right is what you should not do as
html can contain virtually anything that will run with
local privileges unless you do something about it and,
the .doc file could be riddled with viruses. Ideally, if it is text that you want to send, you
should have it inline so that it is easier for the
recipient to quote - if you want to make sure that If layout is central to the purpose of your mail, a fairly good way of achieving this is to use a PDF file as the export. All good, modern word processors have PDF as an export file option so there shouldn't be any problem with getting people to see it the way that it should be seen. As for the contents of .zip files, you can either encrypt the file (and send the key in the body text of the mail - remember that you weren't bothered about keeping things secret in the first place or this problem would never have arisen) so that the recipient can open it but the spam filter cannot see inside the file. |
 If you send out
zipped attachments that could contain contentious files
such as .bat and .exe files, or you attach such files
directly, you could end up having them blocked by email
filters that look for such things.
If you send out
zipped attachments that could contain contentious files
such as .bat and .exe files, or you attach such files
directly, you could end up having them blocked by email
filters that look for such things.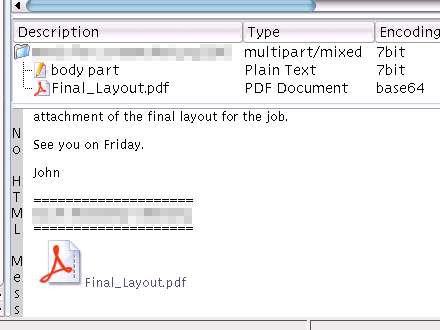 they cannot claim
that you sent something that you didn't, all you have to
do is to sign it with a public key cryptography program
such as PGP or GPG.
they cannot claim
that you sent something that you didn't, all you have to
do is to sign it with a public key cryptography program
such as PGP or GPG.
Fixing broken Windows boot.ini file with KNOPPIXI have been getting many visitors to my web site that have used missing boot.ini or a similar phrase in the search engine. There is a simple way of reinstating the boot.ini file (which should be in the root of the first hard drive's first partition, ie its full path is C:\boot.ini or, /mnt/hda1/boot.ini on a Linux system which we shall come to in a little while) if you have a KNOPPIX CD. Insert the KNOPPIX CD and boot the machine. In KDE, click on the hda1 icon and when Konqueror has opened up, right click on the same icon and select action and then change the write status of the partition. Then...
Your boot ini file should look something like the following... [boot loader] ;timeout=30 default=multi(0)disk(0)rdisk(0)partition(1)\WINDOWS [operating systems] multi(0)disk(0)rdisk(0)partition(1)\WINDOWS="XP Home" /fastdetect Once you have it looking okay, save it or, if you are writing a new one, save the file as boot.ini on your hda1 partition (Windows C: drive). Next, shut down KNOPPIX and remove the CDR (it will tell you when you can do this) and then re-boot. It should all now work. |
Animated icon fileHere is a link to Wilf's animated icon (Earth.ani) from this month's HelpDesk. Click here. |
HelpDesk Extra
About OpenOffice.orgSuite: OpenOffice.org is a suite of very capable office programs providing a word processor, spreadsheet, vector drawing program, presentation program and so on. They are a direct replacement for the Microsoft office programs and will even load and edit (and save if you think you should) your legacy MS proprietary format files (.doc and so on). The only gap in the suite at the moment is a database program and if you want one of those, you can opt for the Sun Microsystems version of the programs. If you are not bothered about writing your own databases, you can get it all - fully functional - for free. License: Licensing for the normal user means that you can have as many copies as you like at no cost. This means that you can have several copies at work and, if you want to take your work home with you, you can have a copy or two (or three and so on) there as well, totally legally. No worries about extra copies installed: This has the effect that there will be nobody threatening to sue you if you install an unregistered copy on your home machine and you can have as many copies at work without anybody worrying about a knock on the door or a letter from someone who wants some money. Licensing not an issue: Therefore, licensing is not an issue which has the knock-on effect that you do not need to manage licenses so that gets rid of all of those silly programs that make money out of you having to pay money. |
Mind MapsA mind map is a graphical representation of a set of organised thought processes. It is a very good way of analysing a problem and discovering what needs special attention and resources. Some applications of mind maps include: programming; moving house; going on holiday; installing a network; setting up a company; and, so on.
If you do this on paper, you will have the advantage that you can work on it in places that you might never take your computer. However, paper has limitations - especially when it comes to flexibility when editing - on a computer with a program that is up to the job (such as OpenOffice.org's presentation or vector drawing program), it is easy to highlight areas and move them around, knowing that all of the thought links will remain intact. If you click on the image above, you will see a full-sized version in a new browser window. It is a hypothetical holiday, just to demonstrate how mind mapping on a computer works. From it, you will be able to see how to generate one on a piece of paper but this is how to create a flexible, editable one on a computer. If you have OpenOffice.org installed on your computer, you can open the file here. |

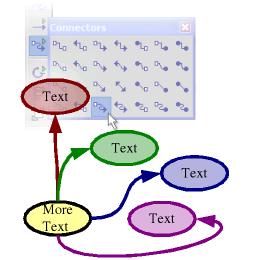
Creating a mind map with OpenOffice.orgThought Blobs: You will see from the image above or from the file that you have opened that the obvious starting place is to draw a filled rectangle (you can use an empty rectangle if you like but why not start off with colour coding?). If you double-click on the box, you can add text to it, changing the font properties (typeface, bold, colour and so on) as you wish. In this central box, put the name of the project - it will be the only thing with corners on the final sheet so it will be fairly easy to spot and you can tell one sheet from another quite easily if you put the project title in the central box. Next, you can create a number of filled ellipses, and put your text in there for your basic questions. At this stage, it is easier to colour code the ellipses as this will make following the thoughts easier although you do not have to do this if you don't want.
Joining them up: With some ellipses
in place, you can now join them up so that they retain
their meaning. If you click on the link icon down the
left hand side and select the curved link that finishes
with an arrow, you can click on a 'parent' ellipse and
then on the thought that is effectively its 'child'.
There are several ways of achieving this...
|
 Now that you have
colour coded ellipses with your text in, it is easy to
work your way along a branch, noting your thoughts in a
logical manner. The easiest way that I have found to do
this is to click on the ellipse that will be the source
of the thought (so that you get the right colour and any
other properties), press [Ctrl][C] to copy it then
[Ctrl][V] to paste it, then move it to where you want and
type in your text. Whilst this takes a little longer than
doing it with a pencil and paper, the advantages will
soon manifest themselves. To make another entry on the
same train of thought, just press [Ctrl][V] and drag that
new box - you only need to copy when you are changing
your thought path.
Now that you have
colour coded ellipses with your text in, it is easy to
work your way along a branch, noting your thoughts in a
logical manner. The easiest way that I have found to do
this is to click on the ellipse that will be the source
of the thought (so that you get the right colour and any
other properties), press [Ctrl][C] to copy it then
[Ctrl][V] to paste it, then move it to where you want and
type in your text. Whilst this takes a little longer than
doing it with a pencil and paper, the advantages will
soon manifest themselves. To make another entry on the
same train of thought, just press [Ctrl][V] and drag that
new box - you only need to copy when you are changing
your thought path. If
you hover the mouse over the main part of the
first ellipse, a dotted box will appear
surrounding the whole shape. If you press the
mouse button now, the start of the link will
appear from the most appropriate of the NSEW
positions for where it has to link to.
If
you hover the mouse over the main part of the
first ellipse, a dotted box will appear
surrounding the whole shape. If you press the
mouse button now, the start of the link will
appear from the most appropriate of the NSEW
positions for where it has to link to. If
you hover the mouse over one of the NSEW
positions, a small box will appear. Clicking now
will make the start of the link appear only from
that position.
If
you hover the mouse over one of the NSEW
positions, a small box will appear. Clicking now
will make the start of the link appear only from
that position. The
same goes for the destination of the link. If it
is over the larger part of the shape, it will
attach itself to the most appropriate part - you
can see how the link will go from the way that it
is previewed.
The
same goes for the destination of the link. If it
is over the larger part of the shape, it will
attach itself to the most appropriate part - you
can see how the link will go from the way that it
is previewed. Again,
if you use just one of the NSEW positions for the
destination, it will only link to that one -
again, previewed.
Again,
if you use just one of the NSEW positions for the
destination, it will only link to that one -
again, previewed.Editing
However, if you want to move just a portion of them - say, to make way for another idea you have just had - you can just highlight the ones you need to move and drag them. With OpenOffice.org, the links will stay linked and any that are changed will adjust themselves accordingly. In the image, you can see the orange coloured thoughts have been highlighted and their outlines indicate where they are being moved to - you can see how the links within the move stay the same but the one that bridges the moved ideas with the static ones adjusts its position automatically. |
 If you want to move
the whole mind map to a slightly different place, you can
just put the mouse in one corner and drag it to the
diametrically opposite corner to highlight the whole page
and then drag the highlighted objects (along with their
links) to wherever you need them to be.
If you want to move
the whole mind map to a slightly different place, you can
just put the mouse in one corner and drag it to the
diametrically opposite corner to highlight the whole page
and then drag the highlighted objects (along with their
links) to wherever you need them to be.DistributionIf you need to distribute your thoughts, you can export them as PDF files if you want to be truly cross-platform. Like all good office programs, PDF export is native to OpenOffice.org although, if you have OpenOffice.org on more than one machine, you can of course, distribute your files in the OpenOffice.org open standards format. |