PC Plus HelpDesk - issue 270
 |
This month, Paul Grosse gives you more
insight into some of the topics dealt with in HelpDesk.
|
 |
HelpDesk
Watch users with 'whowatch'If you need to be able to control processes on another machine, you have probably been using 'top'. However, top doesn't show you how processes are related to each other. So, is there a program that will let you see a process tree and who owns it?
Like all UNIX/Linux programs, this doesn't have security bolted on as an after thought and if you wouldn't normally have rights to send a signal to a process owned by another user, this program will not let you. If you do need to send signals to other user's programs then you need to su to root before you start whowatch. Like top, whowatch is not limited to 24 or 25 lines in the terminal. If you want to drag the bottom of the terminal window down, whowatch will fill it up with extra lines so that you can see more of what is going on. At the bottom of the screenshot, you will notice that there are prompts for extra functionality - changing what is displayed or even viewing the details of a particular process so that you can tell when it started, how much memory it takes and so on. This is a very useful program and can be used locally (open up a terminal by pressing [Ctrl][Alt][F2] and logging on, remembering that you get back to your GUI with [Ctrl][Alt][Fx] where x = usually 4, 7, 9 or 10 depending on which system you are using) or it can be used remotely over an ssh session as in the screenshot. |
Memory stick allocationMotherboards tend to have four or more slots nowadays and they tend to be marked off in pairs. This is so that you can put matched pairs of RAM sticks in and according to the hype, it all runs faster. So, supposing that you have built a computer with four memory slots (two cream, two black) and in slot one, you have a 1GB DDR400 stick.
So, now that you can afford it, should you buy another 1GB DDR400 stick? It would be nice to have 3GB of RAM but it would also be nice to have it fast. Can different arrangements of sticks improve speed? What is the best thing to do? The different coloured slot pairs allow the computer to address memory faster, in a way that is analogous to disc slicing in RAID. Having two identical memory sticks in a pair of slots allows for more efficient memory use on the motherboard. But just how much more? I did some tests using a program that uses so much memory that local caching is eliminated and, as far as any test goes, mimics a real-life memory-hungry application. You can get the directory by clicking here. You can edit the file or change the parameters so that it runs any number but there is no point running it with such a large value that it runs into swap space. The times are measured on Linux. The Vista times are longer and even on Vista Ultimate, there is not the support to get the figures directly - you need to time the program and use a system monitoring program so, if you are running Vista, reboot into KNOPPIX and use that for the trial instead. The program creates an enormous array with one or two millions elements and then creates a hash table and sorts it - doing this last step four times so that it uses up lots of memory. With two million elements, it uses nearly 1.7GB. The combinations of memory sticks in slots, along with the times in seconds for each run are in the diagram - the lower the number, the better. You can see that the two million element times fall roughly into 129, 134 and 141 seconds. Replacing your two 0.5GB sticks with a 1GB stick in slot 3 doesn't change the time but moving it to slot two knocks around 10 per cent off the total time. Filling slots three and four with the two 0.5GB sticks slows things down to somewhere in between. Clearly, having 3GB of RAM allows you to process preposterously large images or multi-media files on Linux or run Photoshop on Vista comfortably but if that 10 per cent of speed is important - say, you want to run a batch job that will take several days but doesn't need that extra RAM - then use only the two 1GB sticks. |
USB Ethernet dongleSometimes, On Windows (98, millennium, 2000 and XP), just plug it in and follow the instructions in the manual. For Linux, plug it in and when it is detected, type in the root password and the network card configuration overview window opens. Select the card and click on 'Edit'. Under the 'General' tab, select the firewall zone that is most appropriate for your needs and then, on 'Device Activation', select 'On Hotplug'. This means that at boot time, when most of these devices are set up by the boot script, if the device itself is not plugged in (as opposed to just the network connection), it will not create an error message. Under the 'Address' tab, you can set the address and so on. Note that before you type in a static IP address, the 'Configuration Name' starts off as the MAC address which you might want to make a note of although you can always get it from 'ifconfig' later if you want to. Finally, click on 'Finish' and everything runs beautifully. Physically, the design of this particular piece of equipment is not as good as it could be - the decision to opt for a fold-flat design as opposed to one where the outer casing of the RJ45 socket is cast on one piece means that the device lacks the sort of strength that is required for network sockets. The word 'delicate' springs to mind. It is supplied with a short USB lead to plug it into your machine and this makes a considerable difference to the amount of stress that it is under - but not really enough to stop it from being a concern. |
Configure your DHCP serverMany of us have children that want to have their own
computer in their own bedroom but, like all teenager's
bedrooms, you don't have any access. Their NICs are
configured Without wanting to get into the domestic politics of teenage households by suggesting that you remind him/her of who runs the home LAN and pays for the Internet, there is a fairly easy way that you can accomplish this without having any access to his machine. You can use your DHCP server to give them a specific
IP address, based upon their hardware. (S)he already uses
your LAN to gain access to the Internet so you can use a
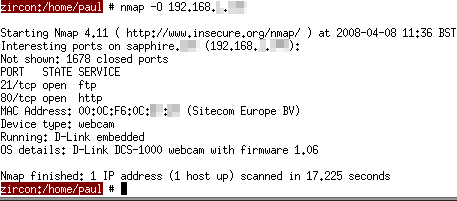
number of tools to find out the machine's MAC address. First of all, run nmap to scan your LAN to find any responsive machines on it. Run ... nmap -sP 192.168.0.0/24 ... substituting 192.168.0.0/24 with your own LAN's
address range and it will arp
everything within that range, reporting which addresses
are responding. Rather than give you just the IP
addresses, it will also give you the domain names where
it can, so spotting an odd one is fairly easy. If it also
gave you the MAC addresses, you can skip the next step. |
Supposing it came up
with 192.168.0.216, you can now scan that machine to find
out its MAC address. Run ...nmap -O 192.168.0.216 ... remembering that you need to be root this time.
This will scan any interesting ports and if there is
enough information to go on, it will also try to guess
the operating system of the machine as well. In amongst
the output data, you will see the MAC address. |
Next, you need to log into the machine
with your DHCP server on it, su to root and edit /etc/dhcpd.conf.
You need to add an entry like the following ...host orion {
hardware ethernet 00:1a:70:90:5f:2e;
fixed-address 192.168.0.216
}
Restart dhcpd by running ... /etc/init.d/dhcpd restart ... and he will get the new address from then on. Finally, add ... 192.168.0.216 orion ... to the '/etc/hosts' file - all done without venturing into a teenager's bedroom. |
Home-made special fonts
Just in case you were thinking that it was going to be expensive, you can also do it for free. So, once you have sorted out your style - here, it is a simple round-tipped pen look (a bit like MS Comic Sans) - just create all of your characters as image files. You can give the files names that reflect their contents such as their ASCII or utf-8 address space labels and so on. The character on the right is called narnar so it is saved as narnar.png. You can find it (and one called shisha.png) by clicking here. You can generate the images by writing them out by hand and then scanning them into the computer or, by using an image processing program such as the GIMP which is the one in use in the image on the right. Here, you can see a path being set up which makes life a lot easier. With an image processor, you can copy serifs and
overlay images so that you get the proportions, weight
and so on consistent throughout your font as you design
it. |
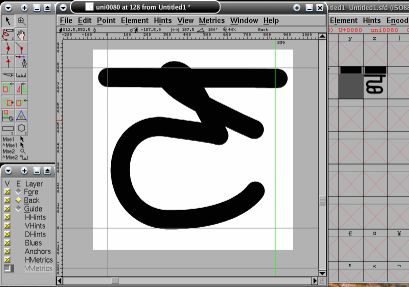 Next, load up FontForge ( http://fontforge.sourceforge.net/
) and in an existing font or a new one (if you just want
to try this out), double-click on an empty glyph of your
choice and then, click on 'File', 'Import' and then
select your glyph's image file. Next, load up FontForge ( http://fontforge.sourceforge.net/
) and in an existing font or a new one (if you just want
to try this out), double-click on an empty glyph of your
choice and then, click on 'File', 'Import' and then
select your glyph's image file.You can scale and move
it by selecting 'E', 'Back' and dragging the image's
extremities. |
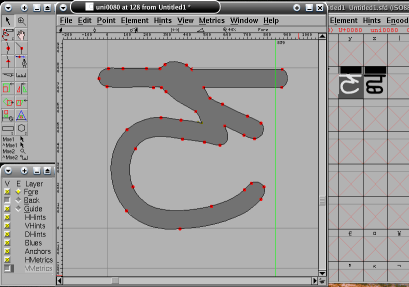 Finally, click on 'Elements', 'Autotrace' to
get the program to outline the glyph for you. Finally, click on 'Elements', 'Autotrace' to
get the program to outline the glyph for you.If it has been overzealous with the points, you can clean up the outline with 'Overlap', 'Remove Overlap' or 'Simplify', 'Simplify More...'. You can add effects such as outline, shadow, wireframe and so on. When finished, generate the font as OpenType and try it out. |
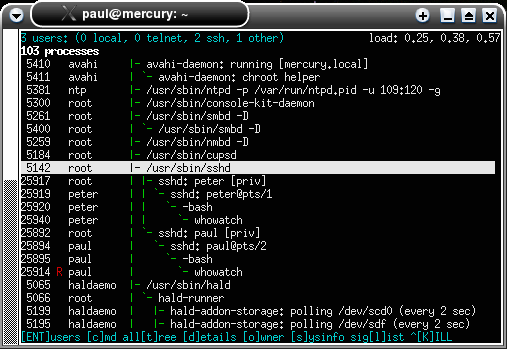 It can be
frustrating, having to trace a process's parent process
ID up through a long branch so that you know what is
going on. However, there is a program called 'whowatch'
that will let you see a tree on a per-user basis,
allowing you to kill off or send signals to whatever you
have rights to.
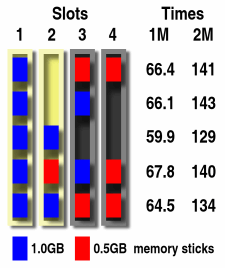 Some
people upgrade their two-slot machines and you might find
that they give you two 0.5GB DDR400 sticks - producing a
very usable 2GB of RAM - these two occupying slots three
and four.
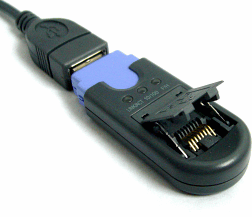 you need to set up a network with just one
other machine - whether it is to try out a server or test
a firewall. So, instead of reconfiguring an existing
network card and then having to reconfigure it back, it
is easier to use a USB Network adaptor.
 automatically
by your home LAN's DHCP server so they don't need you to
'interfere'. However, when they want you to install a
route from your router to their machine so that they can
host their own web server, things change.
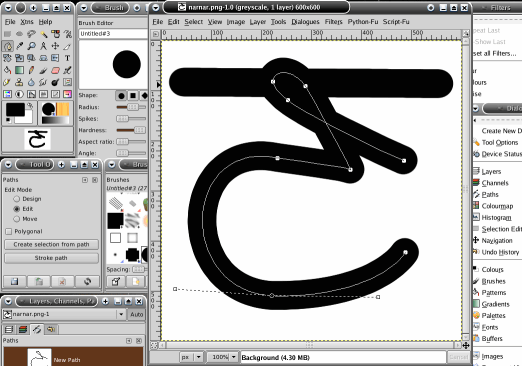 It is
actually quite easy (although time consuming) to create
your own fonts.